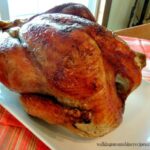
How to Roast the Perfect Turkey
Roast Turkey and the tips you need to Roast the Perfect Turkey for Thanksgiving for your family and friends.
Ingredients
- 15 pound Turkey
- butter
- salt, pepper, poultry seasoning
Instructions
The Night Before Thanksgiving:
- Remove the turkey from the packaging and remove the neck and giblets from the cavity.
- You can use these to make turkey stock if desired...I usually throw them away.
- Rinse the turkey under cold water; making sure you rinse the cavity with water as well.
- Pat dry with paper towels.
- Place the turkey on a tray and cover with paper towels and aluminum foil and place in the refrigerator overnight.
Thanksgiving Morning:
- Remove the turkey from the refrigerator and uncover.
- Place the turkey, breast side up in the roasting pan.
- If you are roasting the turkey with stuffing, add your prepared stuffing now to the cavity of the turkey. If you are not stuffing the turkey, make sure you salt and pepper the cavity.
- You can also add onions, apples, celery, carrots and parsnips to the cavity of the bird. These will all add to moisture and flavor the turkey. Make sure you stuff loosely.
- Turn the wings back or under the bird. Using kitchen twine, truss the legs of the turkey together
- Cover the turkey with softened butter, the more the better. This is Thanksgiving and calories don’t count. Sprinkle the turkey with salt and pepper. I like to also use poultry seasoning. You can use whatever spices you prefer.
- Roast the turkey at 400 degrees for the first 20 minutes. Then lower the oven temperature to 325 degrees and continue cooking until a meat thermometer inserted into the thickest part of the turkey’s thigh reads 170 degrees.
- If you notice that the turkey is getting too brown while it is cooking, cover loosely with aluminum foil.
- Don’t forget to baste your turkey! I like to baste every 20 minutes or so using chicken stock. I also like to baste the turkey a few times with melted butter.
- Once the turkey is finished cooking, remove it from the oven. Take the turkey out of the roasting pan and place on a cutting board. Cover the turkey with aluminum foil. Let the turkey rest for 30 to 60 minutes before carving.
Notes
- I like to roast my turkey early in the day and have it carved before my guests arrive; that way I can have my kitchen clean!
- I then place the sliced turkey in my roaster pan to keep warm.
- I fill the bottom tray of my roaster with warm water and then place the sliced turkey in the other tray and insert into the roaster; turning the roaster to the warm setting.
- The warm water keeps the sliced turkey warm without drying it out.
- Instructions on how to make lump-free gravy are in my post for Pot Roast. It's the SAME recipe, only you'll be using the turkey drippings for turkey gravy instead of the beef broth from the pot roast. Step-by-step photo instructions are included too!
Or visit the QR code below.