


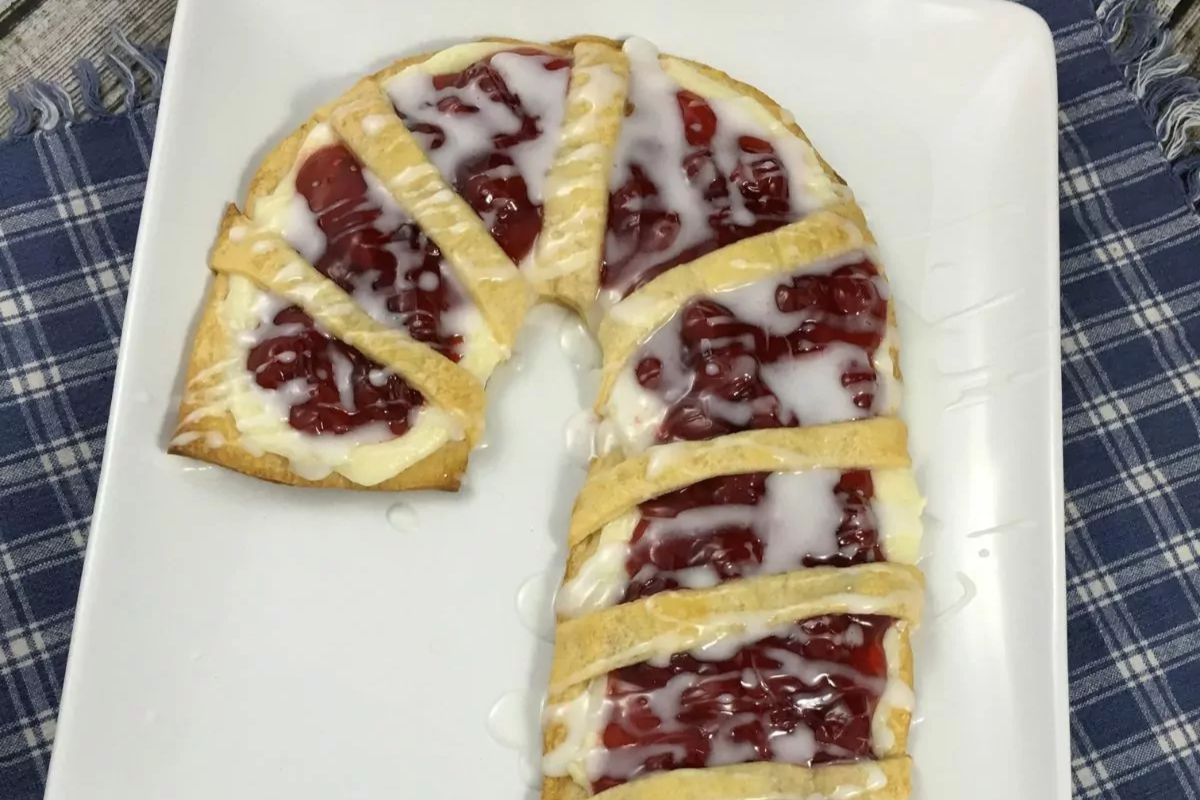
Enjoy a delicious holiday treat that sure to bring joy to your holiday celebrations. This Candy Cane Cream Cheese Danish is made with buttery, flaky crescent rolls, sweetened cream cheese and a delicious cherry pie filling.
The festive candy cane Danish combines everything you love about a breakfast pastry, all wrapped up in a holiday candy cane shape.
Follow the easy step-by-step photos and instructions to help you get the perfect candy cane shaped Danish to serve over the holidays.
Check out all the other Christmas Breakfast Recipes for even more festive ideas!

Want to Save This Recipe?
Enter your email & I'll send it to your inbox. Plus, get great new recipes from me every week!
By submitting this form, you consent to receive emails from Walking on Sunshine Recipes.
I believe I've done a great job illustrating how easy it can be to make the Candy Cane Danish recipe with the help of detailed step-by-step photos.
Don't worry, it may seem complicated at first, but trust me, it's much simpler than it appears. Take your time and enjoy the process. You'll be rewarded with a delightful treat that will surely impress your friends and family.
Looking for more Crescent Roll Recipes? Try my Fruit Tart, Christmas Tree Danish , or my Easy Cream Cheese Breakfast Danish.
Table of Contents
- Candy Cane Puff Pastry
- Stress-Free Holiday Breakfast Magic Awaits! ✨
- Helpful Kitchen Tools
- Main Ingredients Needed:
- Recipe Variations
- Step-by-Step Directions
- Prepare the Cream Cheese Mixture
- How to Place the Candy Cane Stripes
- Baking Instructions
- Before You Begin!
- Storage Tips
- Freezing Tips
- Thawing and Reheating Tips
- Top Tip
- 📖 Recipe Card
- 💬 Comments
Candy Cane Puff Pastry
You can substitute puff pastry for crescent roll dough when making this recipe for candy cane Danish.
This substitution can result in a flakier and more buttery texture for your pastry. Simply follow the same steps below only use a sheet of puff pastry in place of the crescent rolls.
Stress-Free Holiday Breakfast Magic Awaits! ✨
If you need help with getting breakfast ready for the holidays, I've got you covered! Check out my Holiday Magical Breakfast Digital Cookbook.
It's packed with 10 simple recipes, handy checklists, and even printable activities to keep the kids entertained while you work your culinary magic!
Helpful Kitchen Tools
Holiday Plates with Colorful Christmas Tree| Set of 4 Melamine Dishes Christmas Paper Guest Napkins12 oz Christmas Disposable Coffee Cups with White Lids


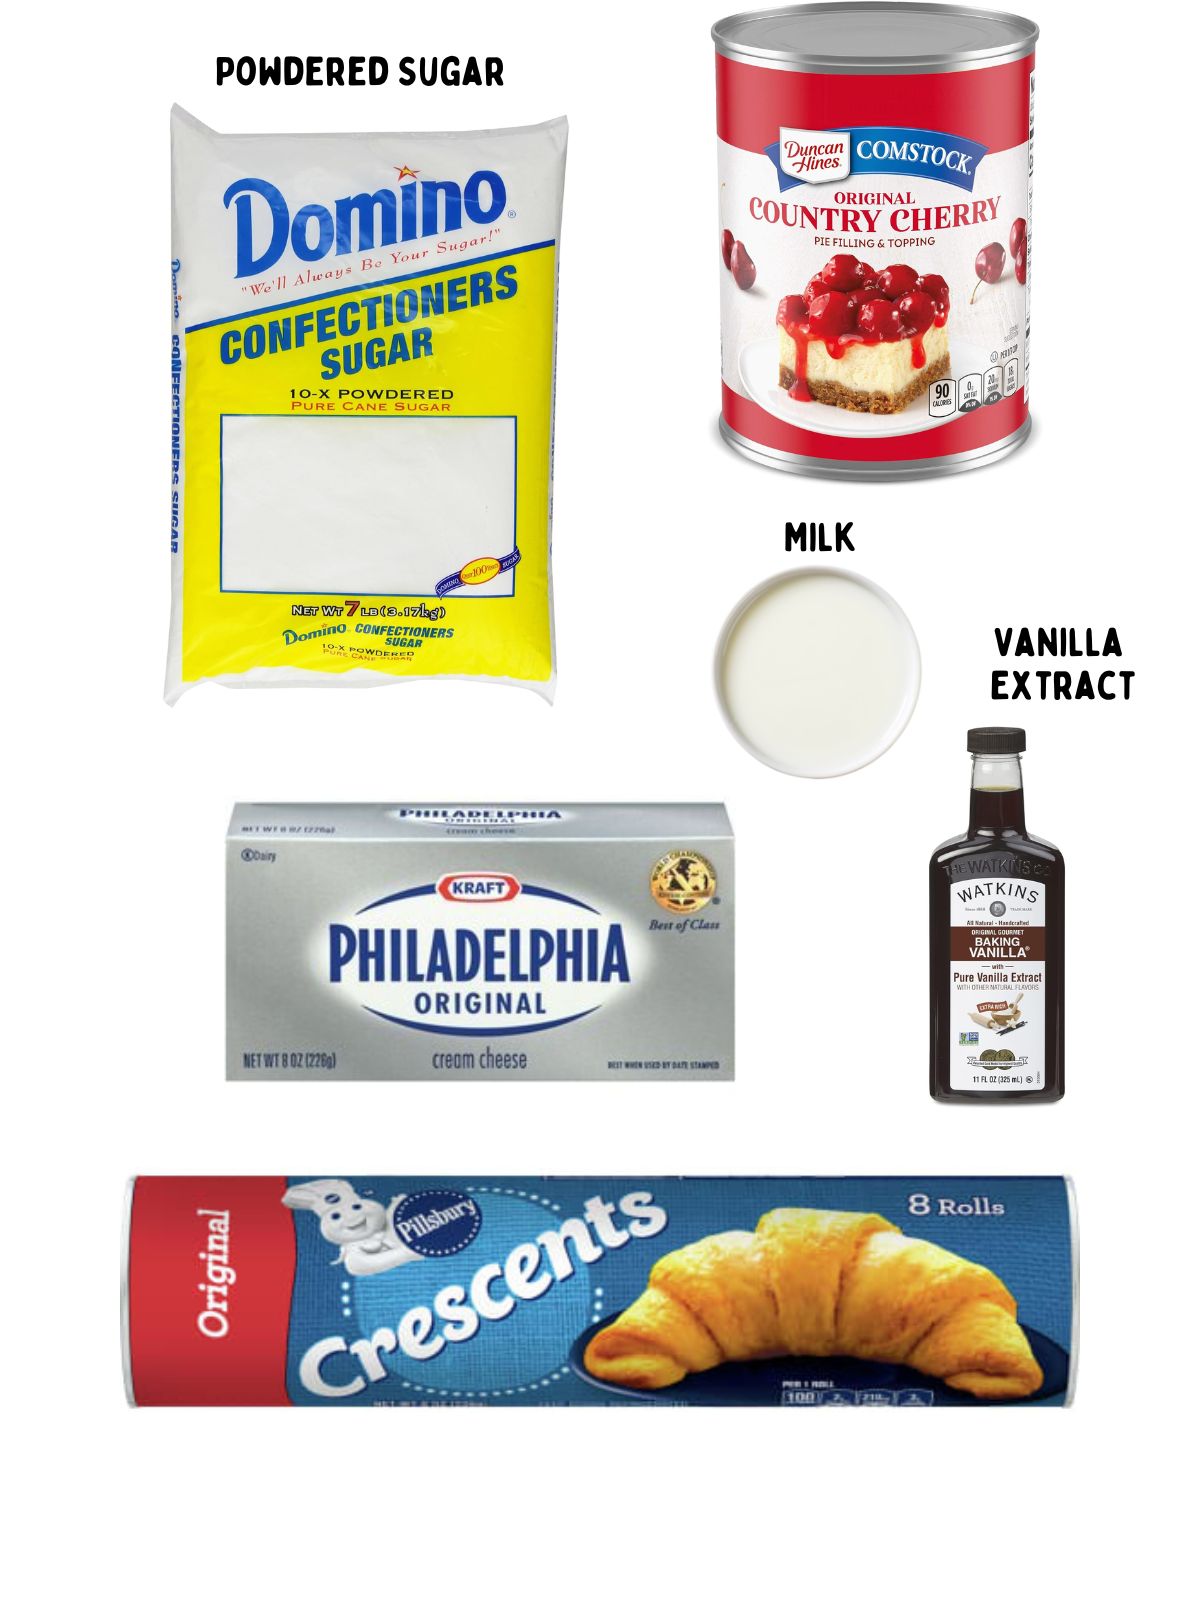
Main Ingredients Needed:
Here's a quick overview of the ingredients for this recipe. Find the exact amounts and click the Instacart button to easily add them to your cart – all in the printable recipe card below!
Recipe Variations
- You can use the crescent roll sheet pastry or you can use one tube of crescent rolls. Either way is fine but what's really important is to draw the candy cane on parchment paper to create a template.
- Do not separate the crescent rolls when you open the can.
- Roll them out and press the seams together to form one large rectangle of crescent dough.
- If you don't like cherry pie filling, you can use strawberry or even raspberry pie filling. Or use strawberry jam!
Step-by-Step Directions
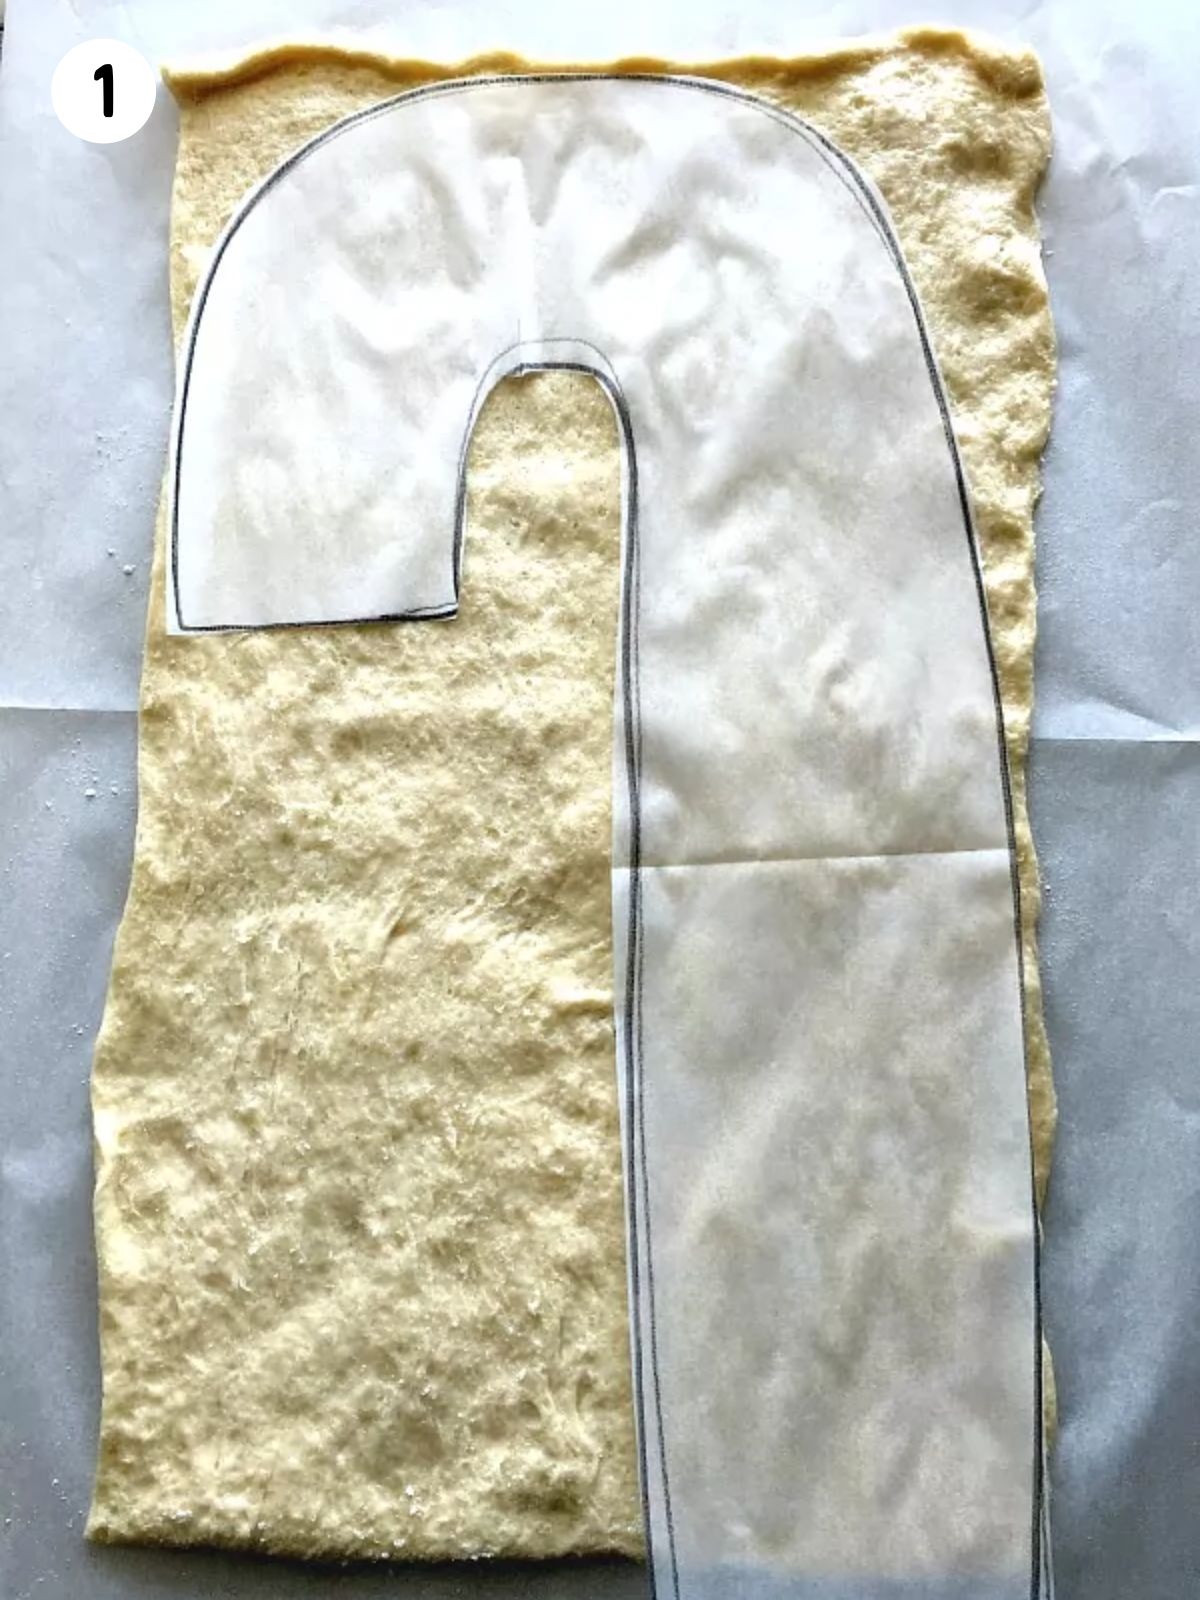
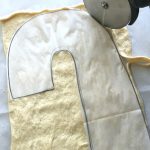
Step 1: Start by placing the parchment paper cut out on top of the crescent rolls.

Step 2: Using a pizza cutter, cut out the shape of the candy cane. You can also use a sharp knife as well.
Prepare the Cream Cheese Mixture
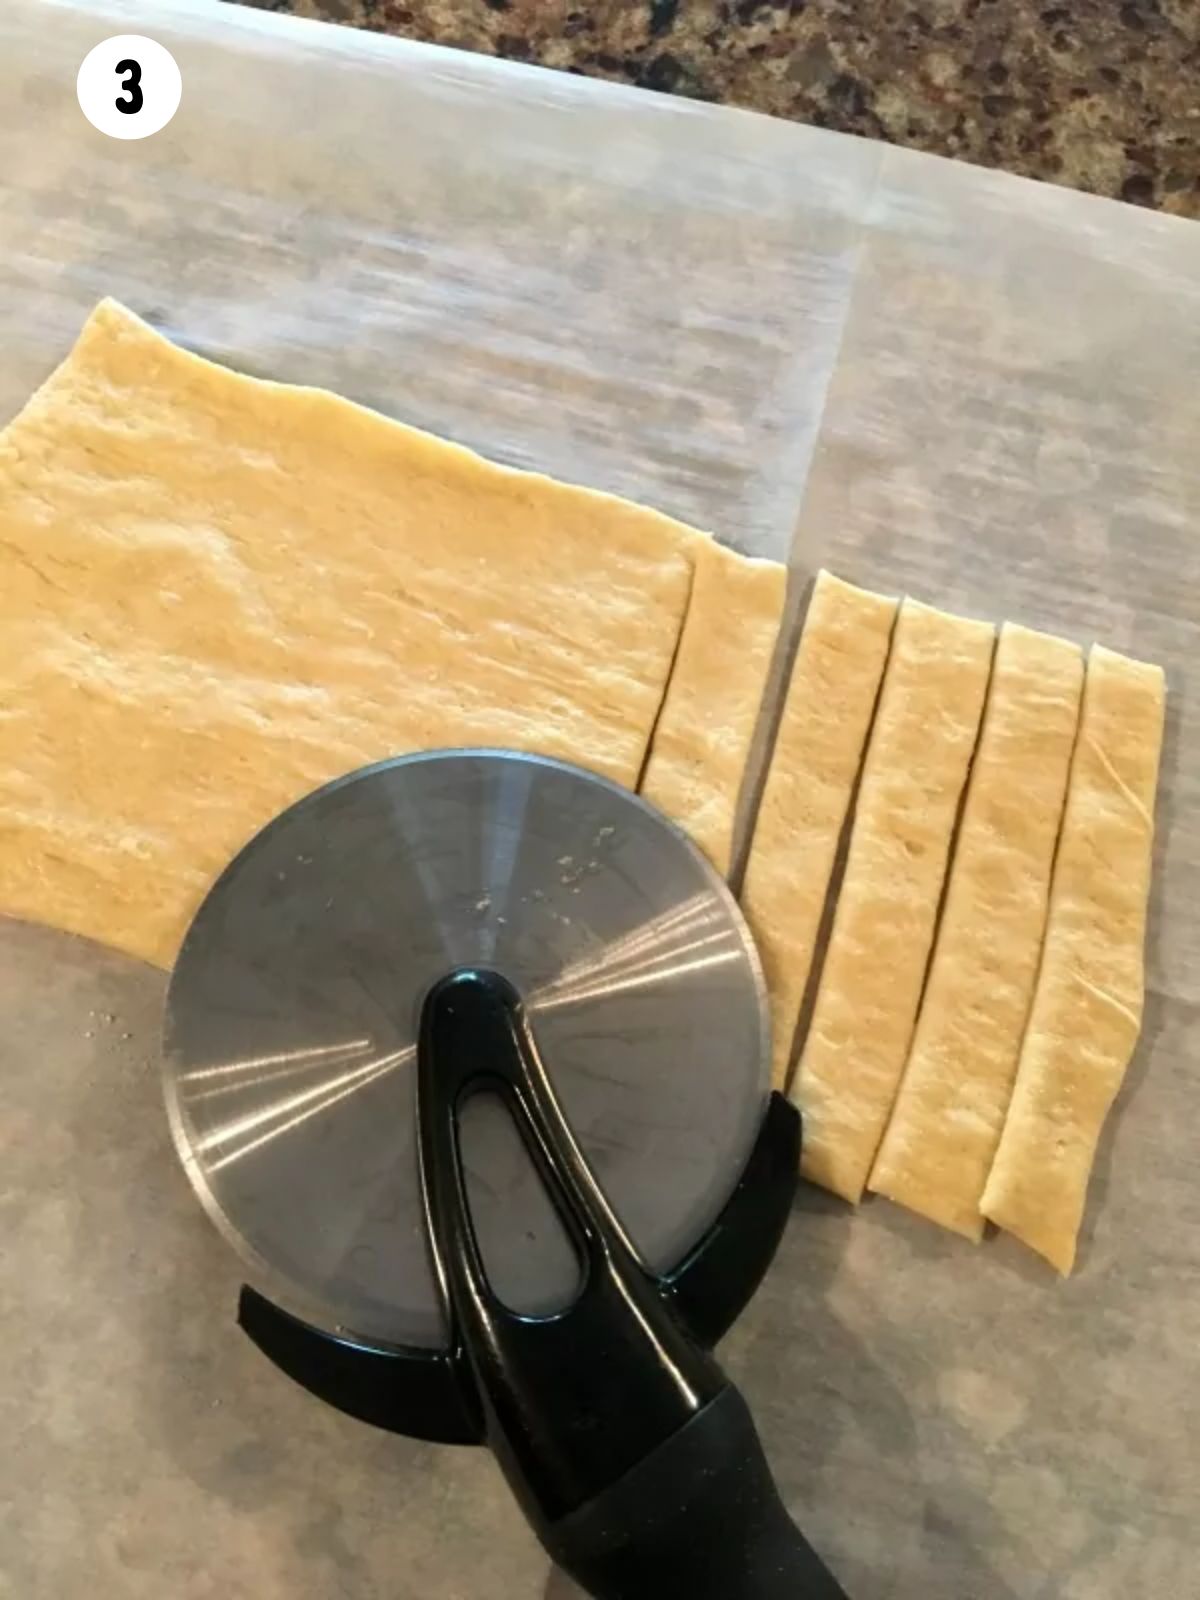
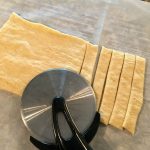
Step 3: After you finish cutting out the main candy cane shape, you will have extra crescent roll dough leftover. Cut out the stripes with the extra dough.
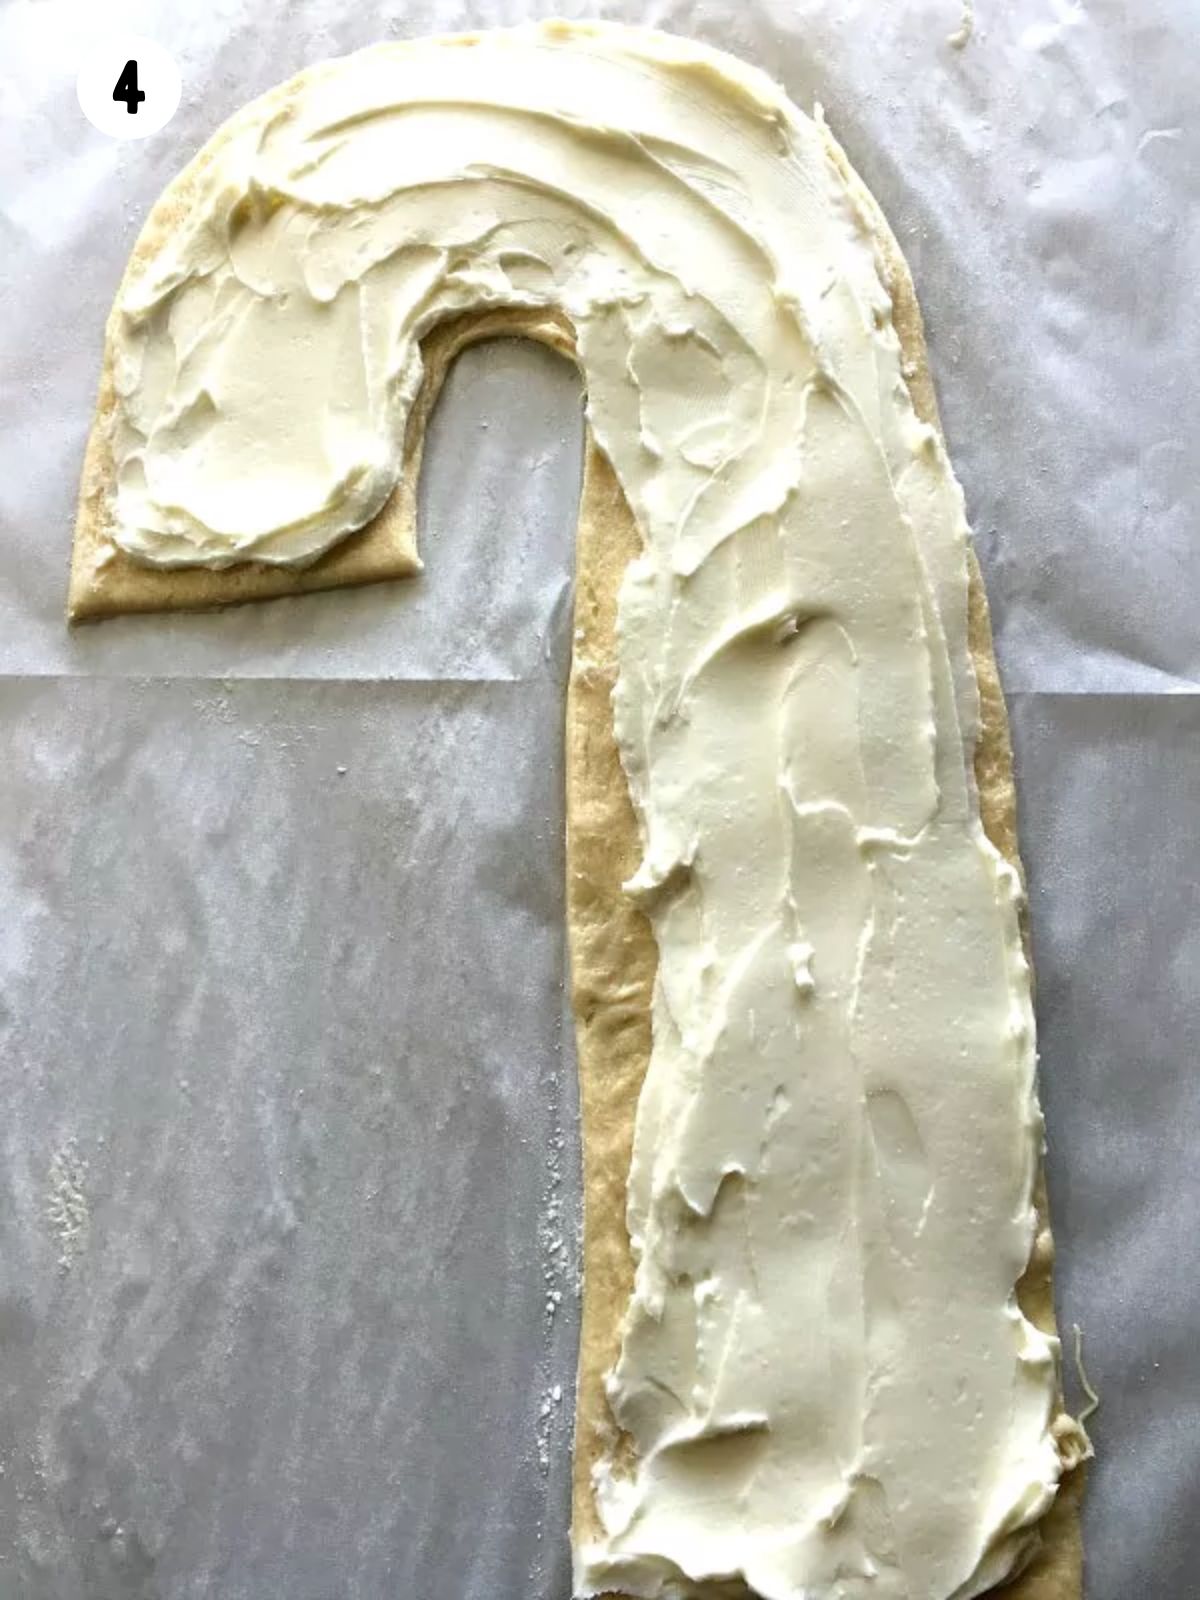
Step 4: In the bowl of an electric mixer, combine together the softened cream cheese, powdered sugar and vanilla until well blended. Spread the cream cheese mixture on top of the candy cane dough.
How to Place the Candy Cane Stripes
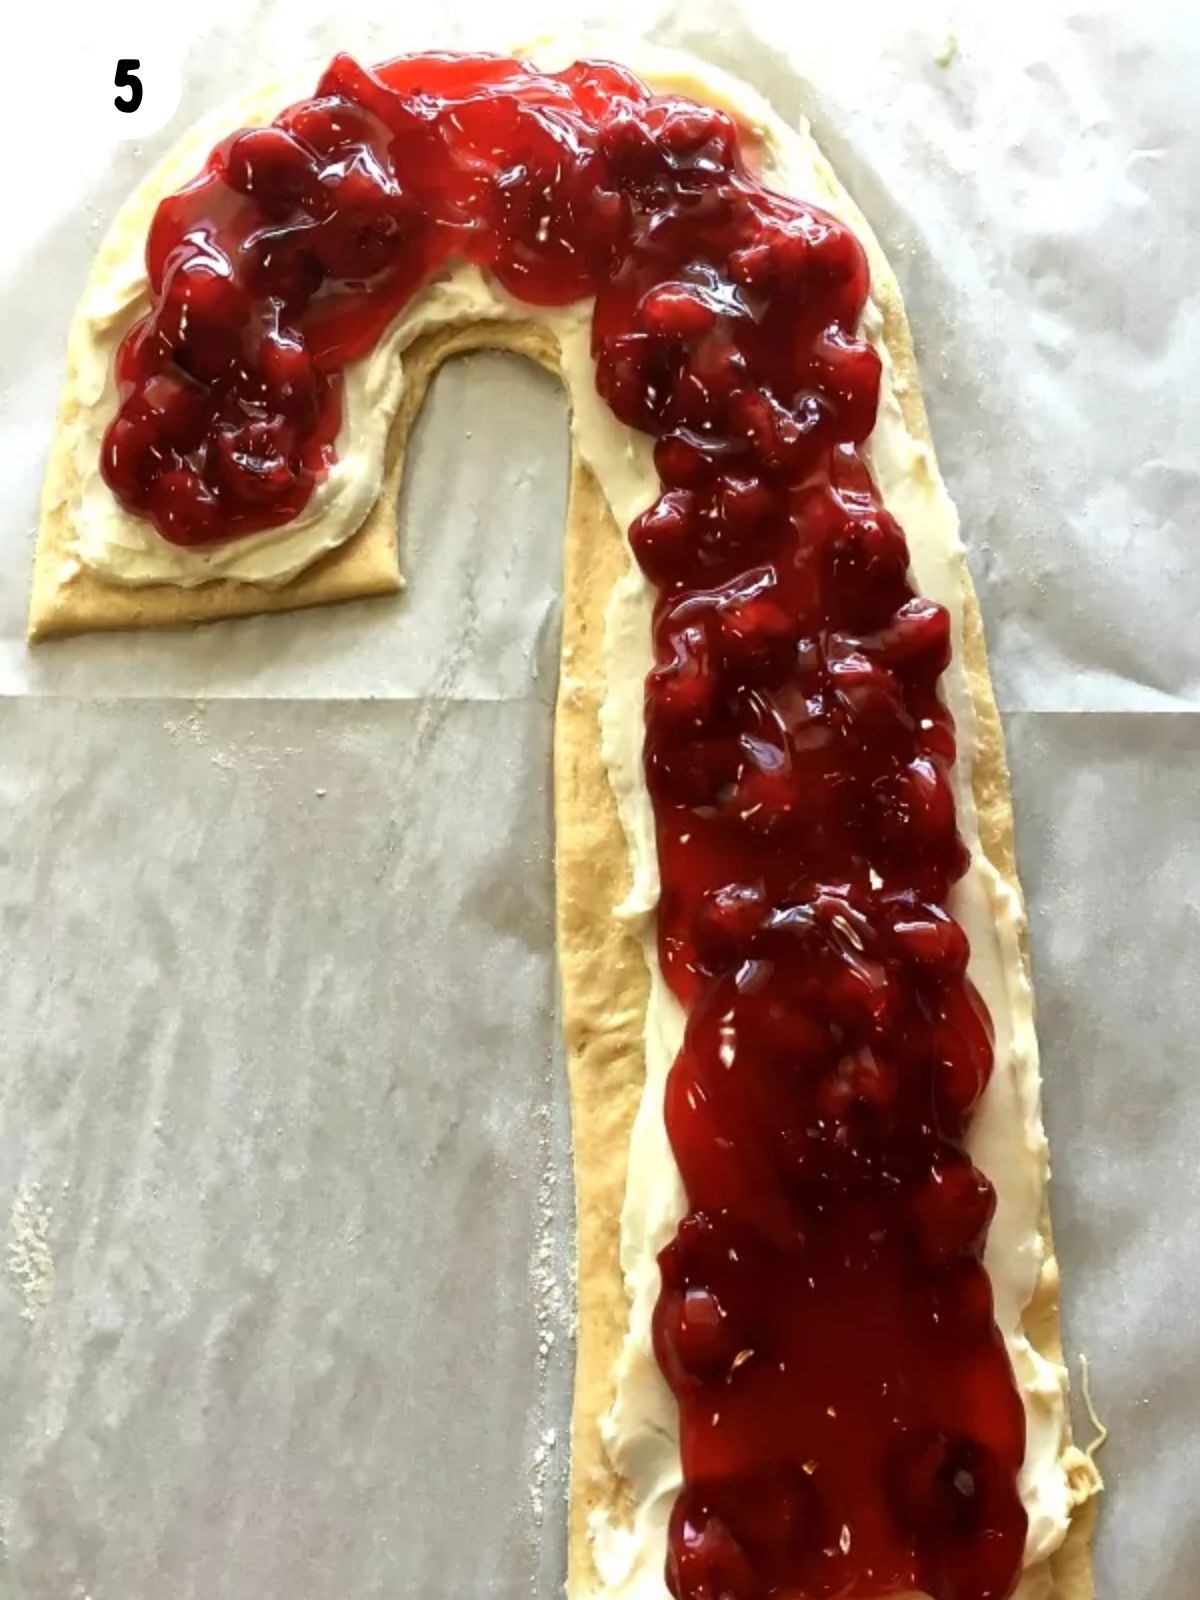
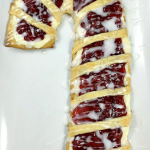
Step 5: Spread the cherry pie filling on top being careful not to spread it too close to the edge of cream cheese filling.
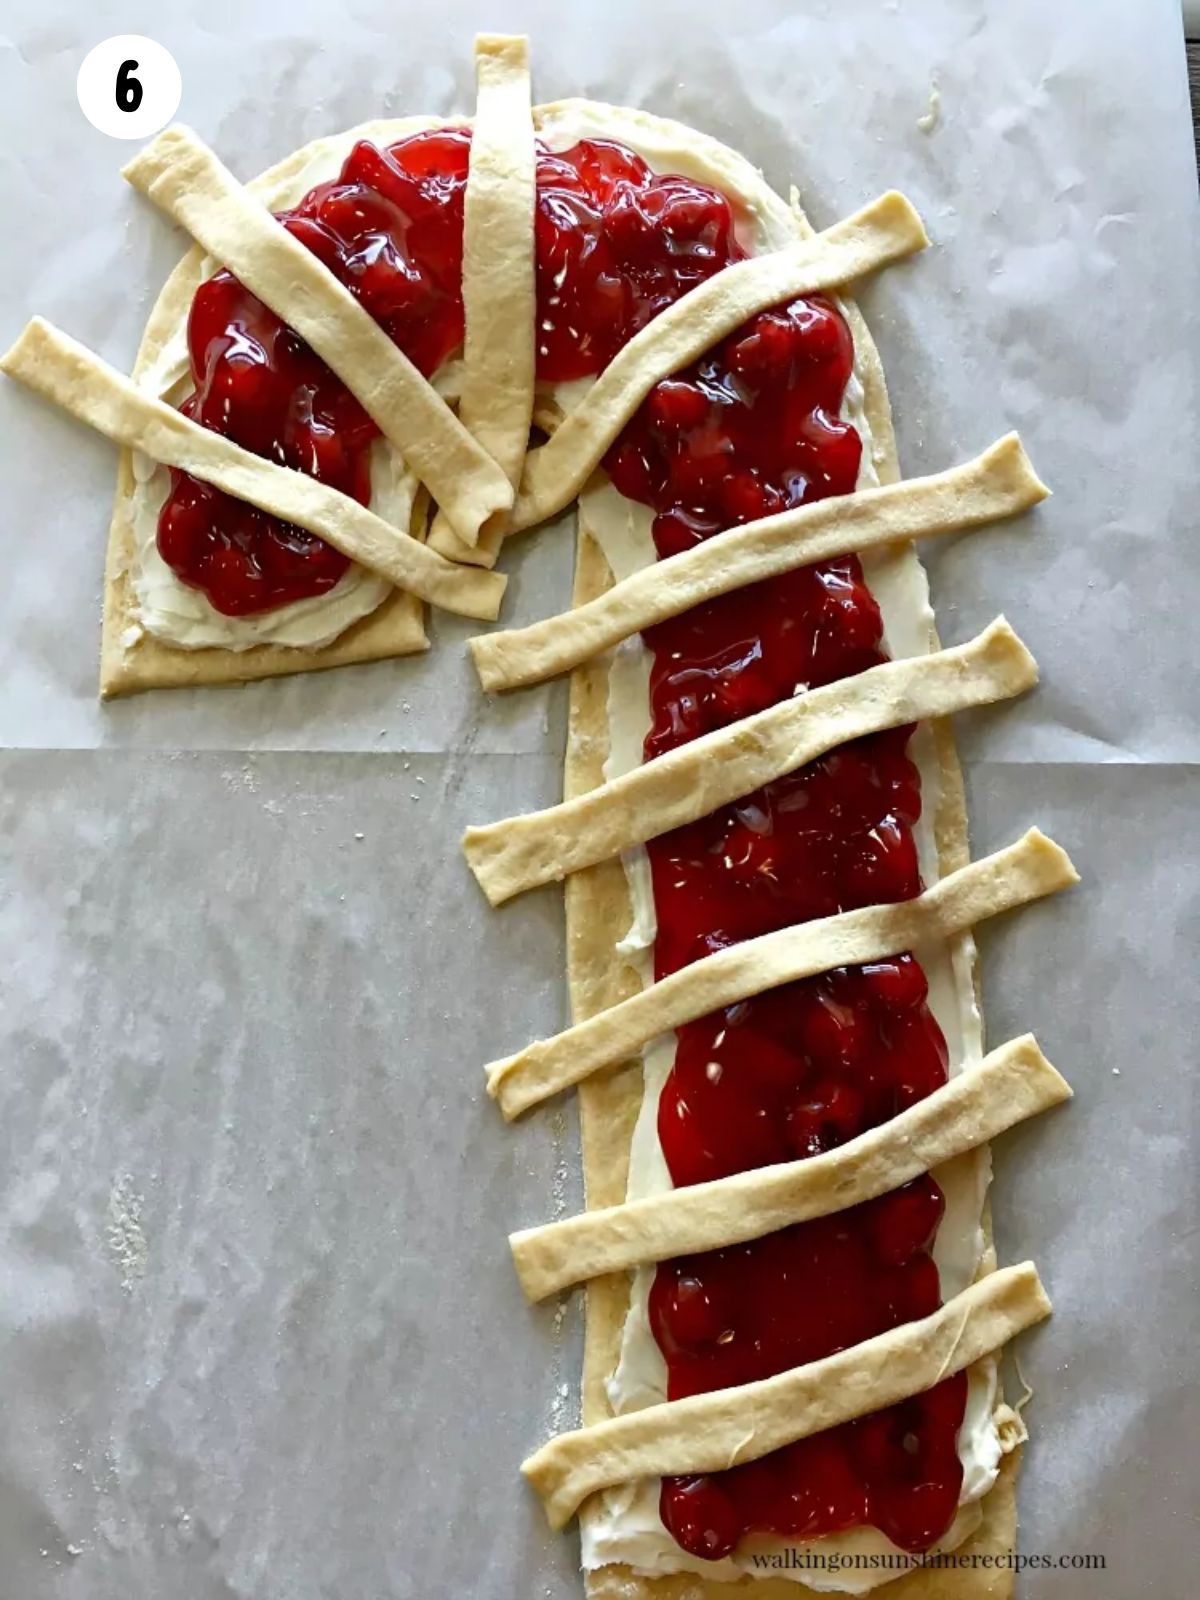
Step 6: Now add the strips of dough to form the stripes of the candy cane Tuck the ends under to make everything neat.
Baking Instructions
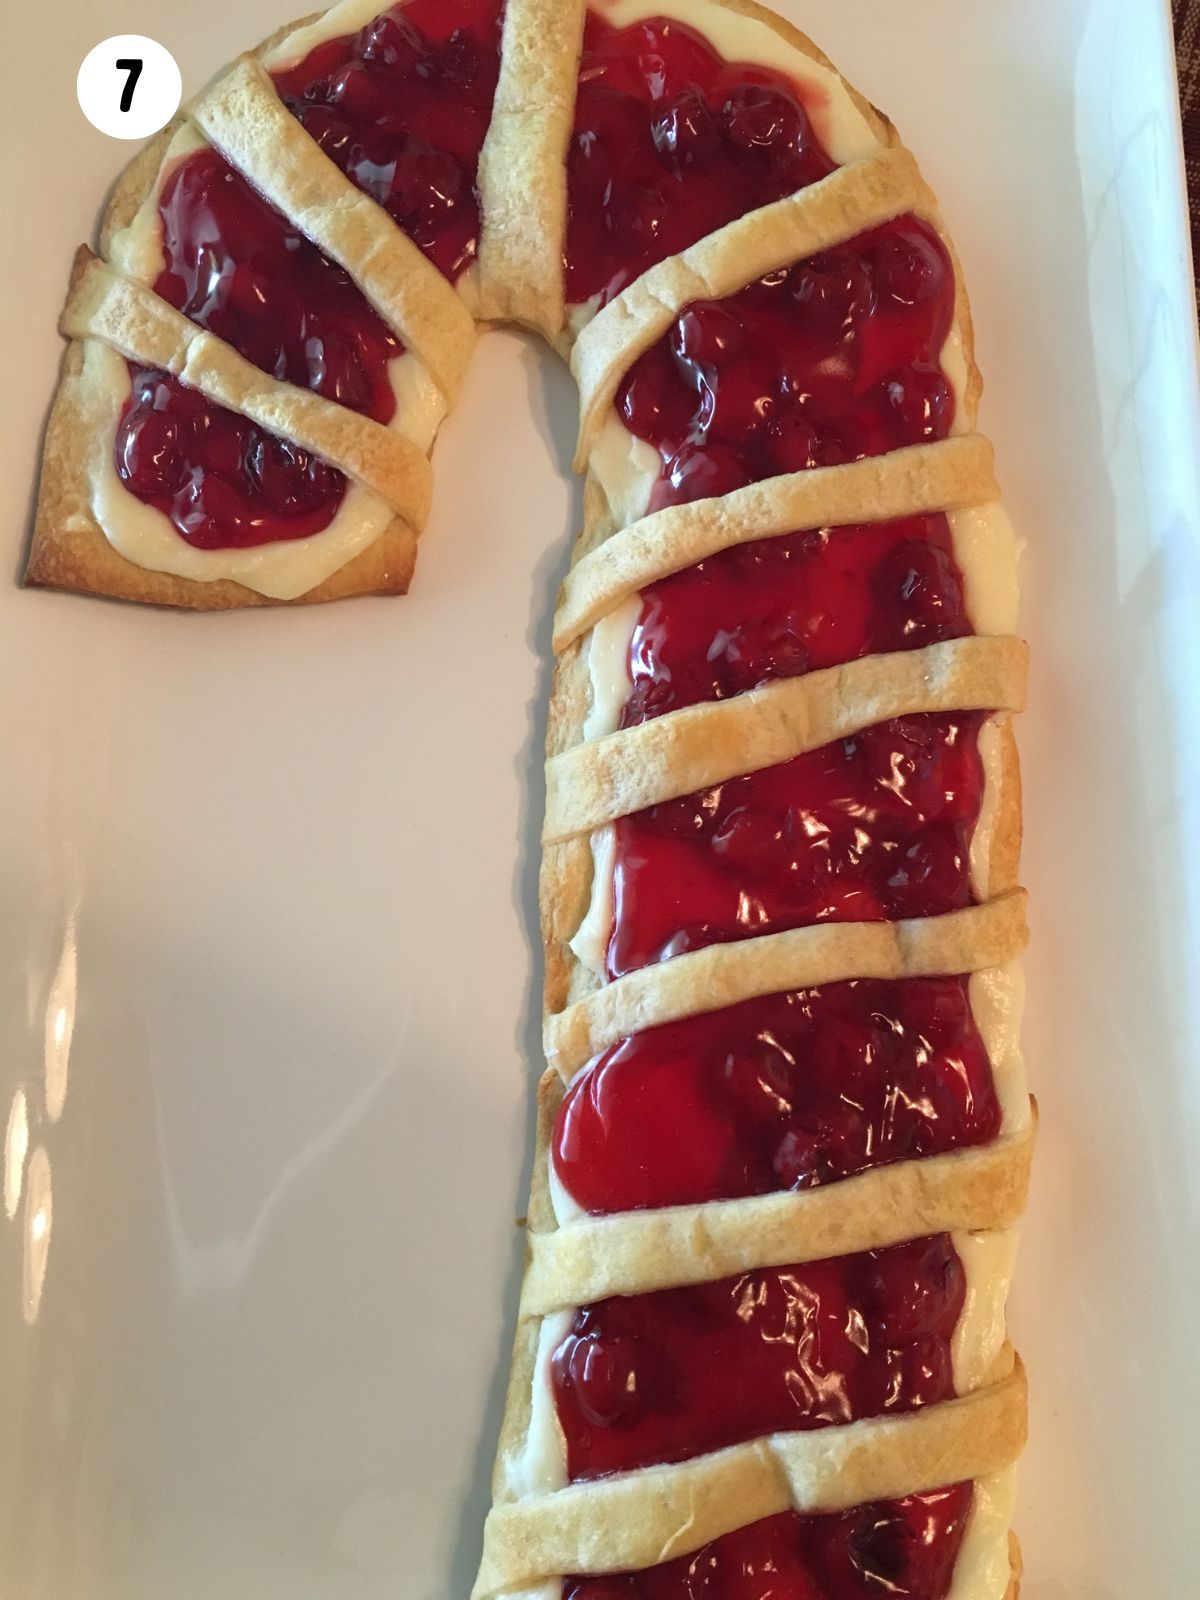
Step 7: Bake in a 350° F preheated oven for 15 minutes or until the Danish is golden brown.
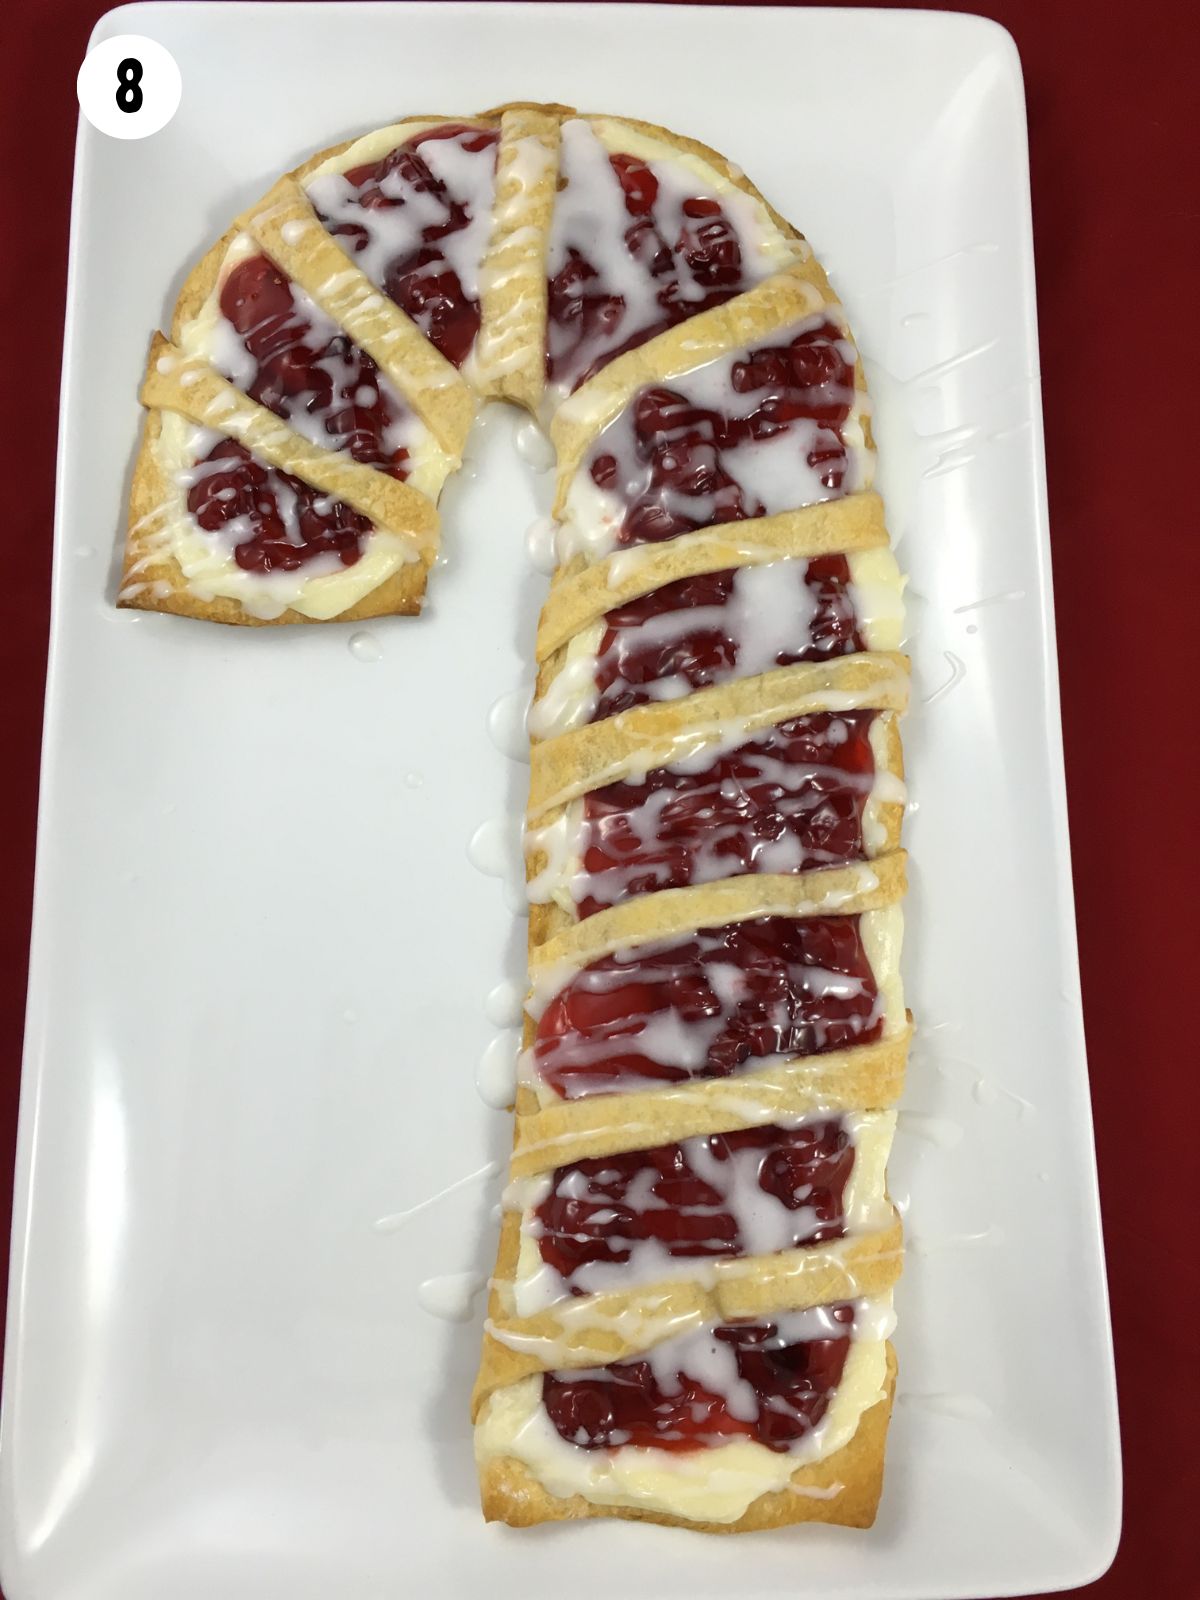
Step 8: Prepare the powdered sugar glaze and add it right before serving.
Before You Begin!
If you make this recipe, please leave a review and star rating. This helps my business thrive and continue providing FREE recipes.

Storage Tips
- Allow the candy cane fruit Danish to cool completely before storing. This will help prevent condensation and maintain its texture.
- Place the Danish in an airtight container or wrap it tightly in plastic wrap.
- Store it in the refrigerator for up to 3 days.
Freezing Tips
Flash freeze the leftover Danish on a baking tray lined with parchment paper.
Once frozen, remove and store the Danish in an airtight container. The Danish will keep fresh in the freezer for up to 3 months.
Thawing and Reheating Tips
When you're ready to enjoy the stored cherry Danish, thaw at room temperature for a few hours or overnight in the refrigerator.
Reheat them in a preheated oven at 350°F for about 10 minutes until warmed through. You can also reheat in a microwave.
Top Tip
Try to use a baking sheet without a rim, so you can easily slide off the cooked candy cane Danish without any worries of it breaking.
You can use parchment paper or line the pan with a Silpat mat to ensure that your candy cane Danish doesn't stick to the pan. By following these tips, you'll have a much better and enjoyable baking experience!
10 Easy-to-Make Holiday Breakfast Recipes, Planning Checklists and MORE!More Information
📖 Recipe Card

Candy Cane Cream Cheese Danish
Ingredients
For the Danish
- 1 package crescent seamless dough sheet
- 1 8 ounce package cream cheese; softened
- ½ cup powdered sugar
- ½ teaspoon vanilla extract
- 1 cup cherry pie filling; more if needed
For the Glaze
- 1 cup powdered sugar
- 1 tablespoon milk
Instructions
- Unroll the crescent roll dough sheet on top of parchment paper. Using your fingers or a pastry roller, flatten the dough just a little so it lays perfectly smooth. Lay the parchment paper candy cane template on top of the dough and using a pizza cutter or a knife cut out the candy cane shape.
- Reserve the leftover dough to make the stripes of the candy cane.
- In a mixing bowl, mix together the cream cheese, powdered sugar and vanilla until well blended.
- Spread the cream cheese mixture on top of the crescent rolls.
- Spoon the pie filling on top being careful not to go to close to the edges.
- Cut the reserved dough into strips and place them on top of your filling to create the stripes of the candy cane.
- Tuck the edges of the stripes under the candy cane.
- Carefully pick up the parchment paper and place on a 9X14 baking sheet.
- Bake in a 350 degree oven for 15 to 20 minutes or until the crescent rolls are golden brown.
- Mix together the ingredients for the glaze and drizzle over the candy cane.
Notes
- If you are not using the crescent dough sheet, you can use a can of crescent rolls. Only do not separate the crescent rolls when you open the can. Roll them out and press the seams together to form one large rectangle of crescent dough. Then place the candy cane parchment paper template on top and continue with the recipe.
- You will not use the whole can of cherry pie filling. You can freeze whatever leftover pie filling you have after making this recipe and use it for another recipe.
This post was originally published in 2014. It has been updated with new photos and tips for creating the perfect Candy Cane Danish.

Lori Putnam says
Can't wait to try this on Christmas morning! And even if my shaped cane isn't as perfect as the picture, that's okay. I'm sure it will taste fabulous! Thanks for sharing.
Lois says
It's really not that difficult and I'm sure your candy cane danish is going to look perfect! Thank you for visiting.
Dana C says
I made this, this morning! So easy to make, and was a big hit. I used raspberry filling instead of cherry. New tradition for my family...thank you!
Lois says
Thank YOU! I'm so happy you enjoyed the recipe and had a nice celebration with your family.
Nancy says
This is so adorable! Definitely gonna do this for Christmas morning!! So cute....my Grandkids will love it.
Nancy
Lois says
Thank you Nancy! Merry Christmas to you and your family.
Cherryl Ehlenburg says
I love doing stuff like this! I will definitely be making it for our holiday gathering this year!
Lois says
Enjoy your holiday gathering and the recipe! Sounds like fun!
angie says
this really looks good, sure to be the winner of best dish Thanks for sharing.
Martha says
Hi
I live in Australia and we don't have crescent dough. Is another pastry like puff pastry or shortcrust pastry be OK?
Lois says
You could try puff pastry. Use a round biscuit cutter and cut out the circle shapes and continue with the recipe. I'm not really sure though as puff pastry will really puff up. But try it and see! Please come back and let me know. Thank you for visiting.
Anonymous says
This looks good and I can't wait to try it. Could you assemble it the night before and bake it in the morning? Michelle
Madelyn says
Can you make this the night before?
I don’t have time in the morning
Will it be soggy
.
Lois says
I really recommend preparing it the day you want to serve though for best results, however, if you do make it the night before, store in the refrigerator. Remove from the refrigerator at least an hour before serving so it can come to room temperature.
Roseann Hampton says
What a great addition to the Christmas breakfast menu!