


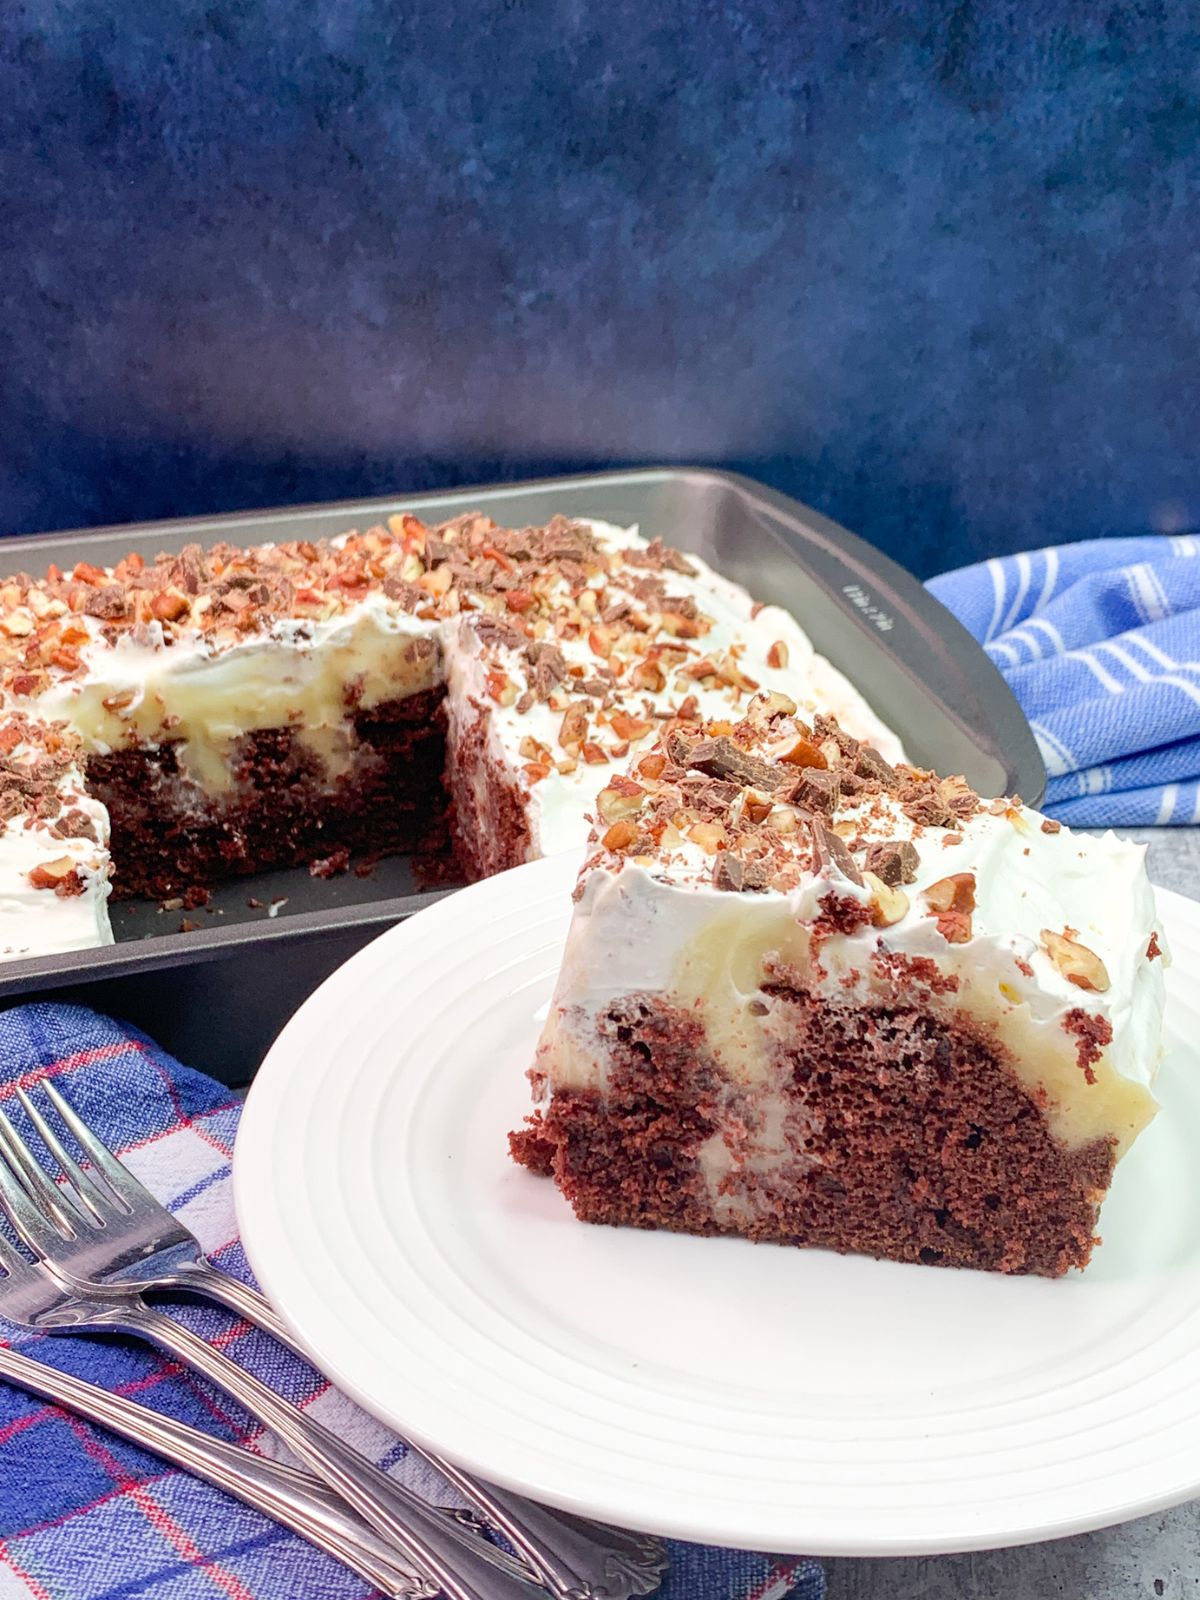
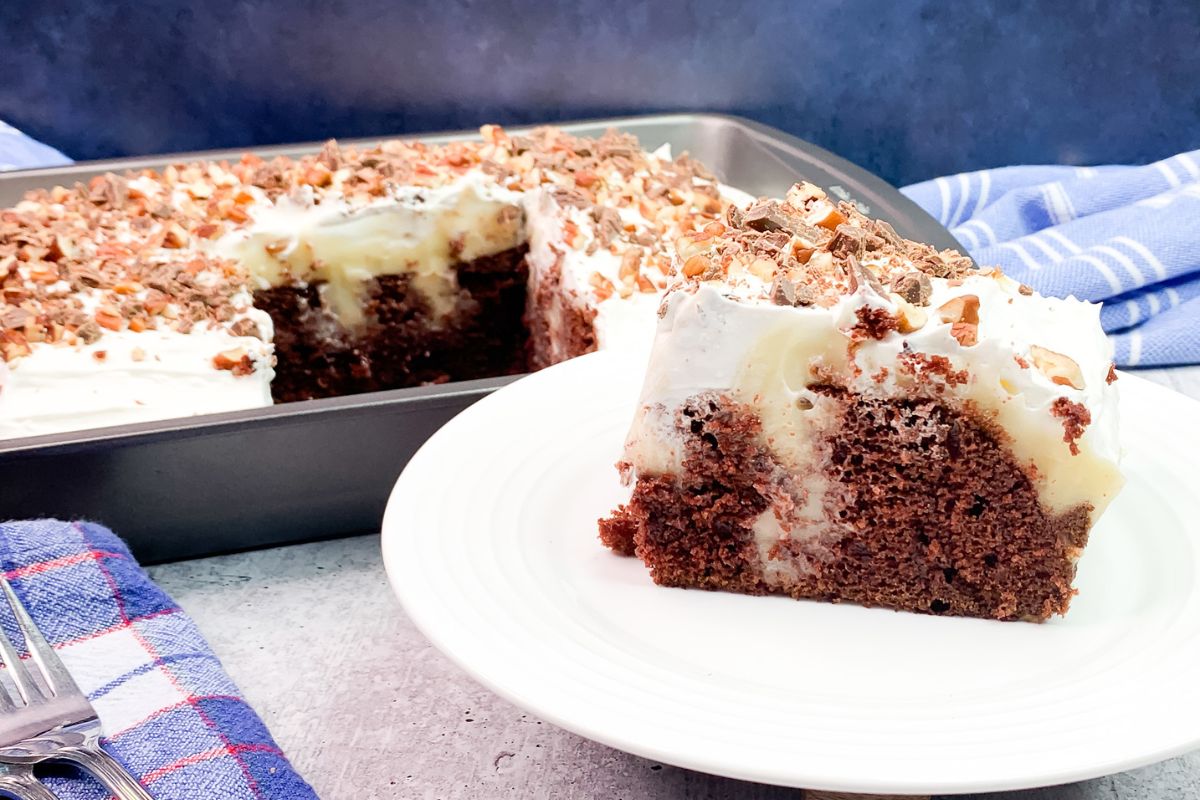
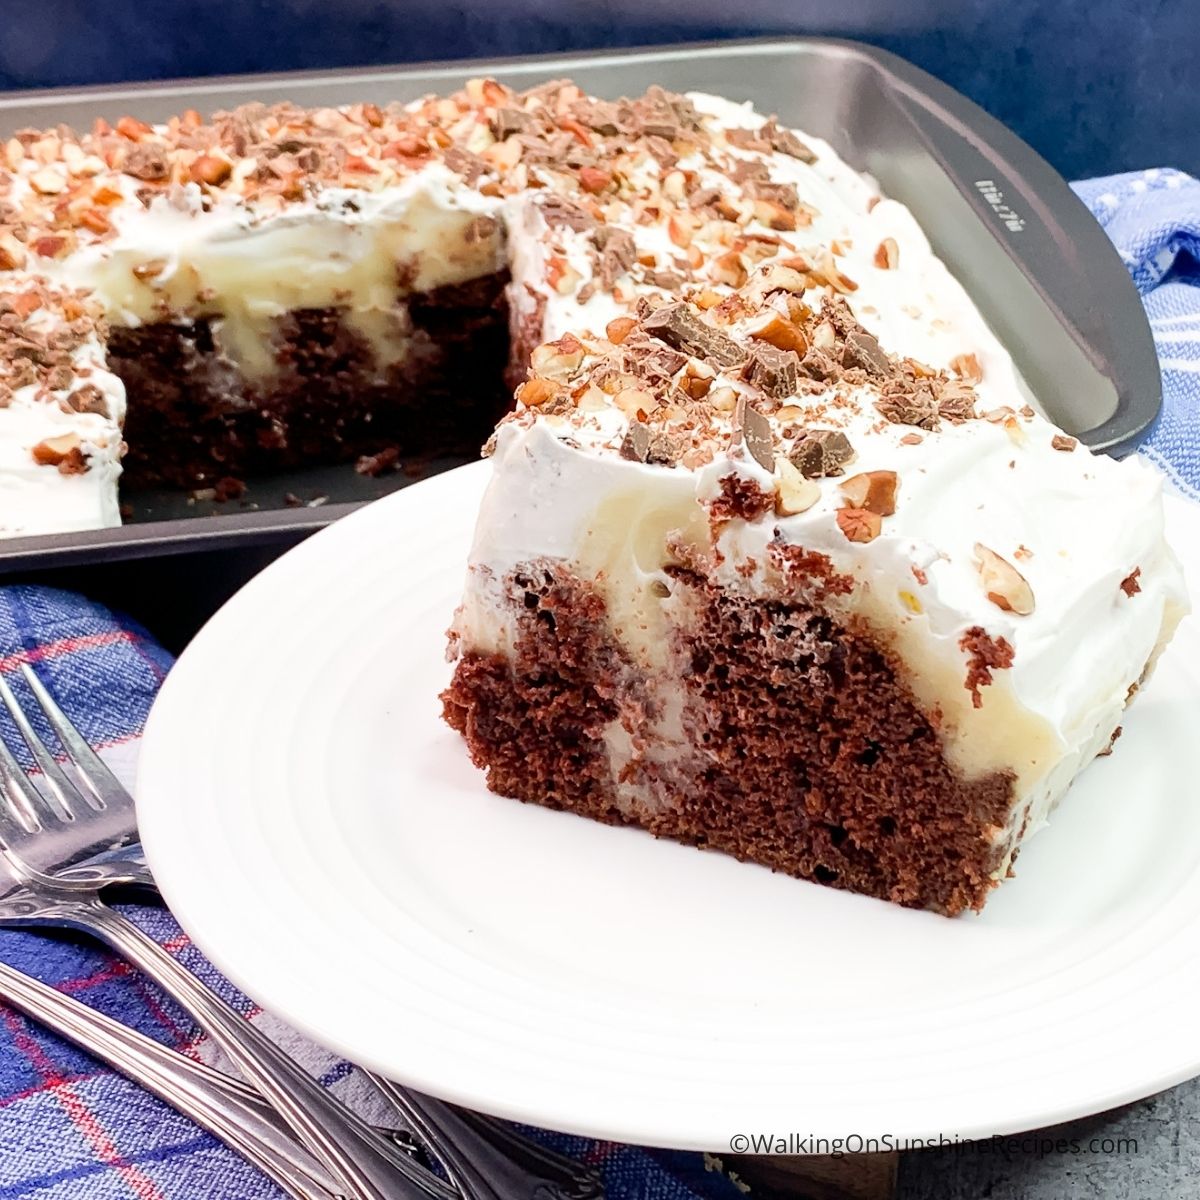
This cheesecake pudding cake is a fun way to turn a plain cake mix into something extra special.
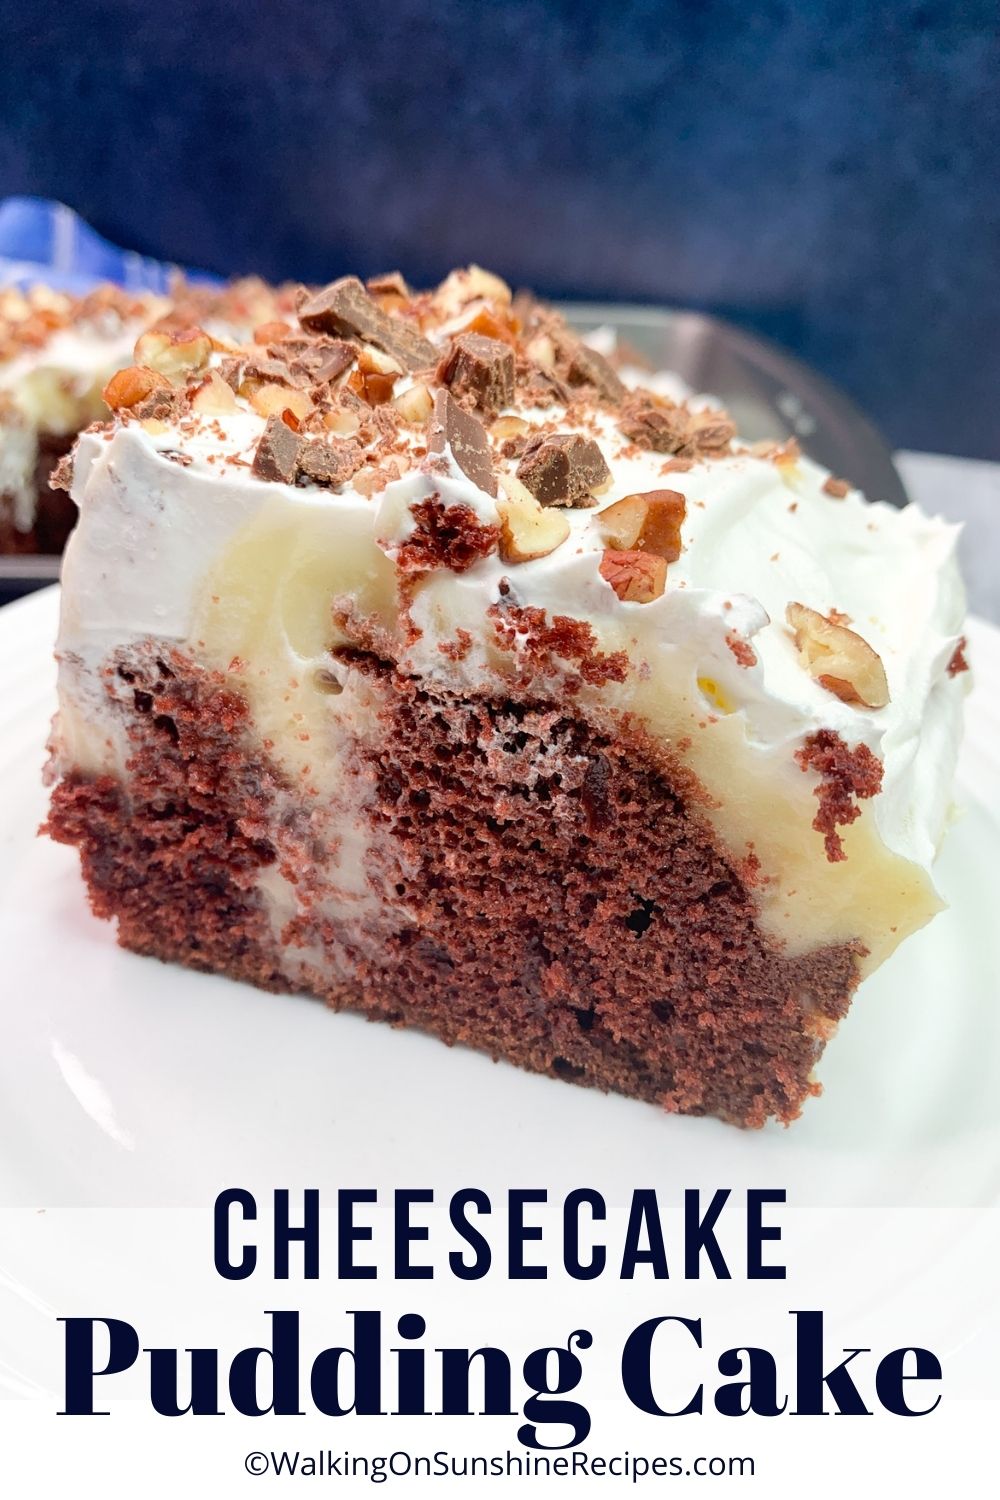
It starts with a chocolate cake mix, then cheesecake pudding mix is poured into the warm cake, making it a poke cake with creamy cheesecake stripes throughout. The result is an easy dessert that looks impressive but takes very little effort to make.
Want to Save This Recipe?
Enter your email & I'll send it to your inbox. Plus, get great new recipes from me every week!
By submitting this form, you consent to receive emails from Walking on Sunshine Recipes.
Recipe at a Glance
Prep: 15 min | Cook/Bake: 35 min | Chill: 60 min | Difficulty: Easy | Servings: 12
Main Ingredients: chocolate cake mix, cheesecake pudding mix, eggs, Cool Whip
Best For: Potlucks, family gatherings, casual desserts
Make Ahead: Can be baked a day ahead and frosted before serving
Storage: Store covered in the refrigerator for up to 4 days
SUMMARIZE & SAVE THIS CONTENT ON
Table of Contents
- Recipe at a Glance
- Why my family LOVES this recipe and yours will too!
- Recommended Kitchen Tools
- My Kitchen Tools Essentials
- Main Ingredients Needed
- Substitutions and Variations
- Step-by-Step Directions
- Storage, Freezing and Thawing Instructions
- Recipe FAQ's
- More Cake Mix Recipes to Love
- LOVE this recipe? SAVE it for Later!
- 📖 Recipe Card
- 💬 Comments

Why my family LOVES this recipe and yours will too!
This recipe is one of my favorite cake mix hacks because it uses everyday ingredients to create something that looks and tastes like you spent much more time on it.
What my family loves most is the combination of chocolate cake and creamy cheesecake pudding in every slice. Those cheesecake pudding pokes running through the cake make each piece soft, rich, and just a little extra fun to serve.
And if you're looking for more poke cake recipes, try this Patriotic Poke Cake or my Strawberry Poke Cake Recipe.
Recommended Kitchen Tools
For a full list of kitchen tools used in this recipe, be sure to check the recipe card below. You can also browse my Favorite Kitchen Tools by clicking the photo below.

Check out my list...
My Kitchen Tools Essentials
Tools that will make your time easier and faster in the kitchen!
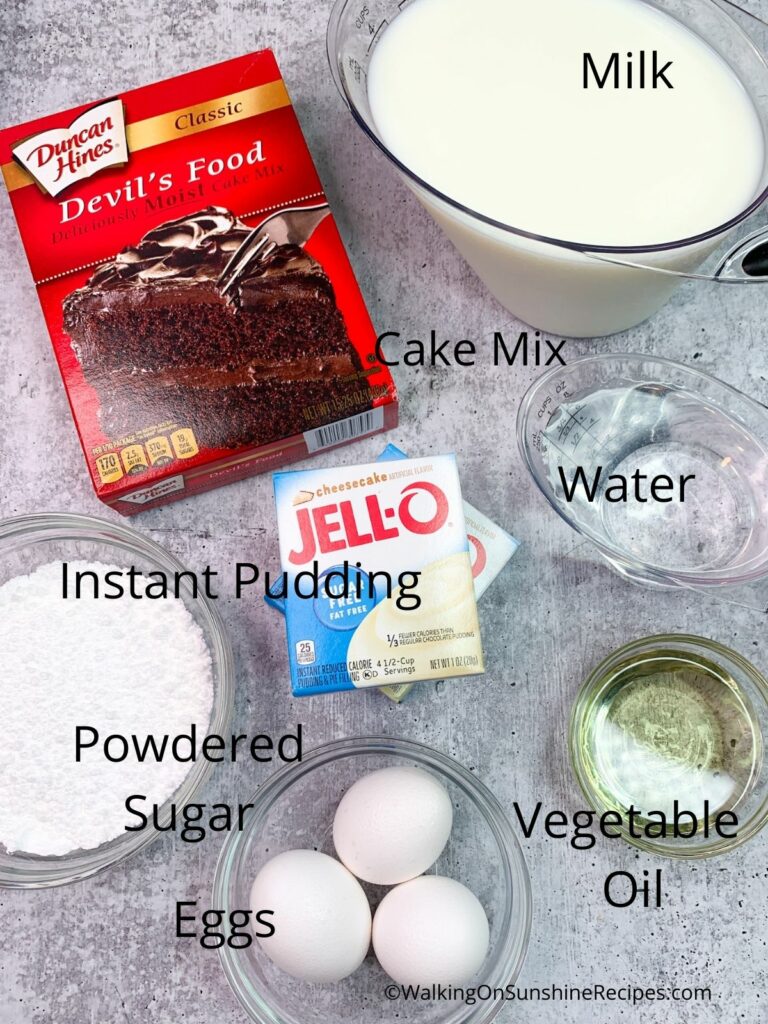
Main Ingredients Needed
Here's a quick overview of the ingredients for this recipe. Find the exact amounts and click the Instacart button to easily add them to your cart – all in the printable recipe card below!
Substitutions and Variations
- Yellow Cake Mix - You could definitely use a yellow cake mix instead of chocolate.
- Pudding Mix - If you do use a yellow cake mix, I would use a chocolate pudding mix so you can see the strips of the pudding throughout the cake when you slice it.
- Strawberry Cake Mix/Vanilla Pudding Mix - this would another pretty cake and pudding combination. See this Strawberry Cake with Marshmallow Filling on my website!
- Milk - I used 2% milk to prepare the pudding but you could use whole milk or fat free. I don't think it will make any difference.
- Frosting - I used Cool Whip Whipped Topping because that is what I had on hand. You could use a traditional frosting if you prefer. The Cool Whip is not as heavy or sugary as a canned frosting.
Step-by-Step Directions
This section includes step-by-step photos and instructions to guide you through the recipe. For the complete printable version, scroll down to the recipe card below.
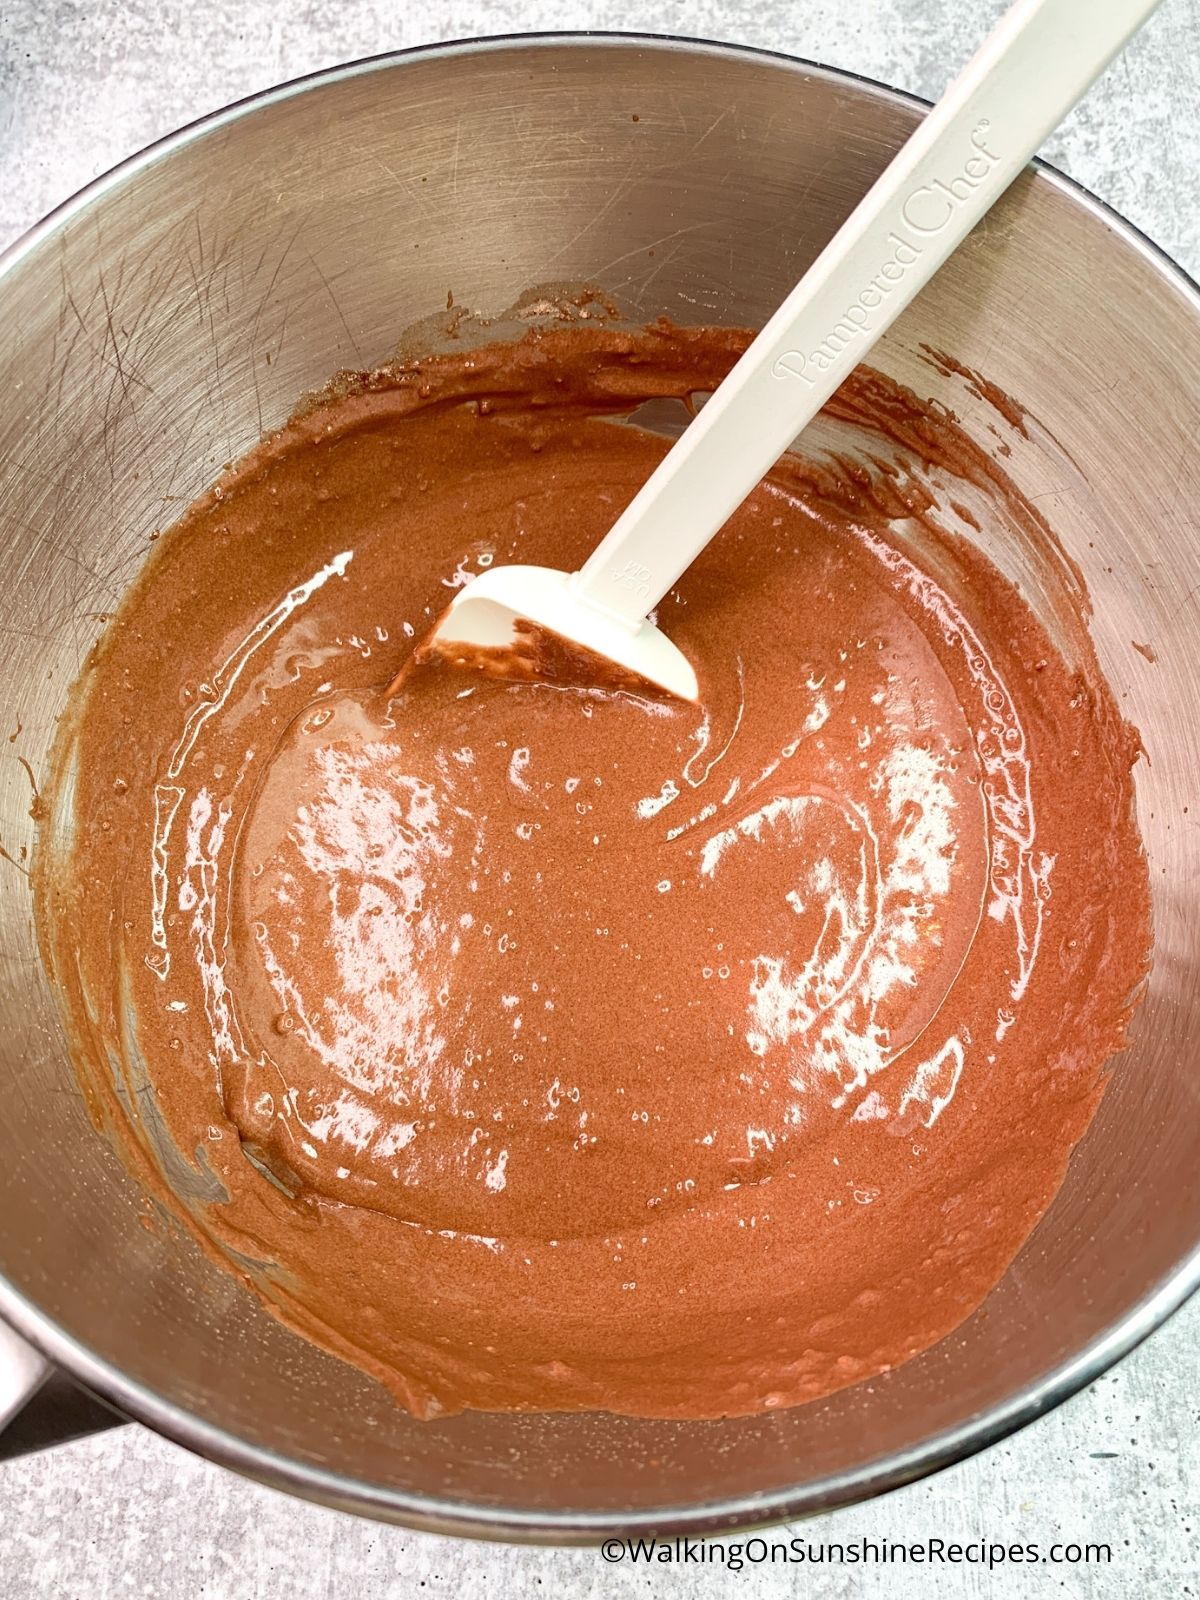
Step 1: Follow the instructions on the cake mix box to prepare the batter. Once the batter is ready, pour it into a 13X9-inch baking pan that has been coated with non-stick baking spray. Bake the cake as directed on the package, ensuring it reaches the recommended temperature and doneness.
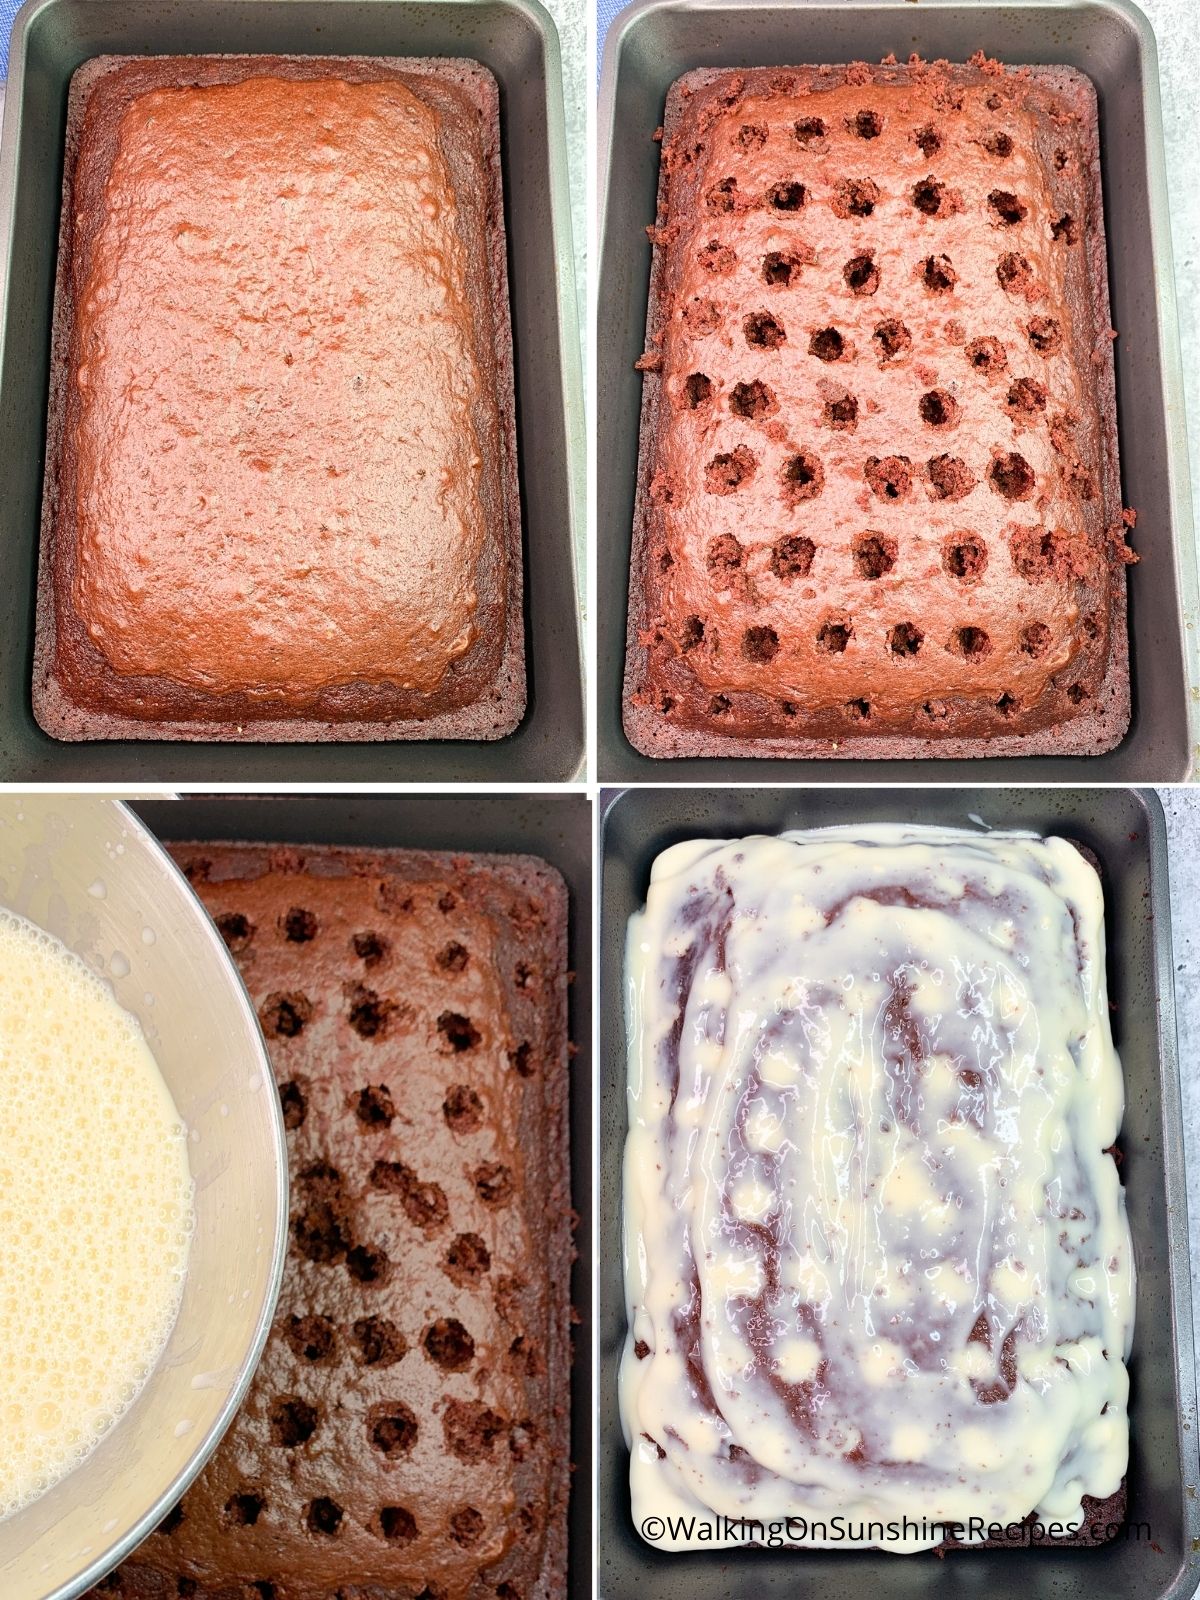
Step 2: After the cake has cooled slightly, poke holes all over the surface using the rounded handle of a wooden spoon. In a large bowl, using an electric mixer, combine the two boxes of pudding mix with the powdered sugar, then stir in the milk. While the pudding is still thin, pour about half of it evenly over the cake, ensuring it fills the poked holes.
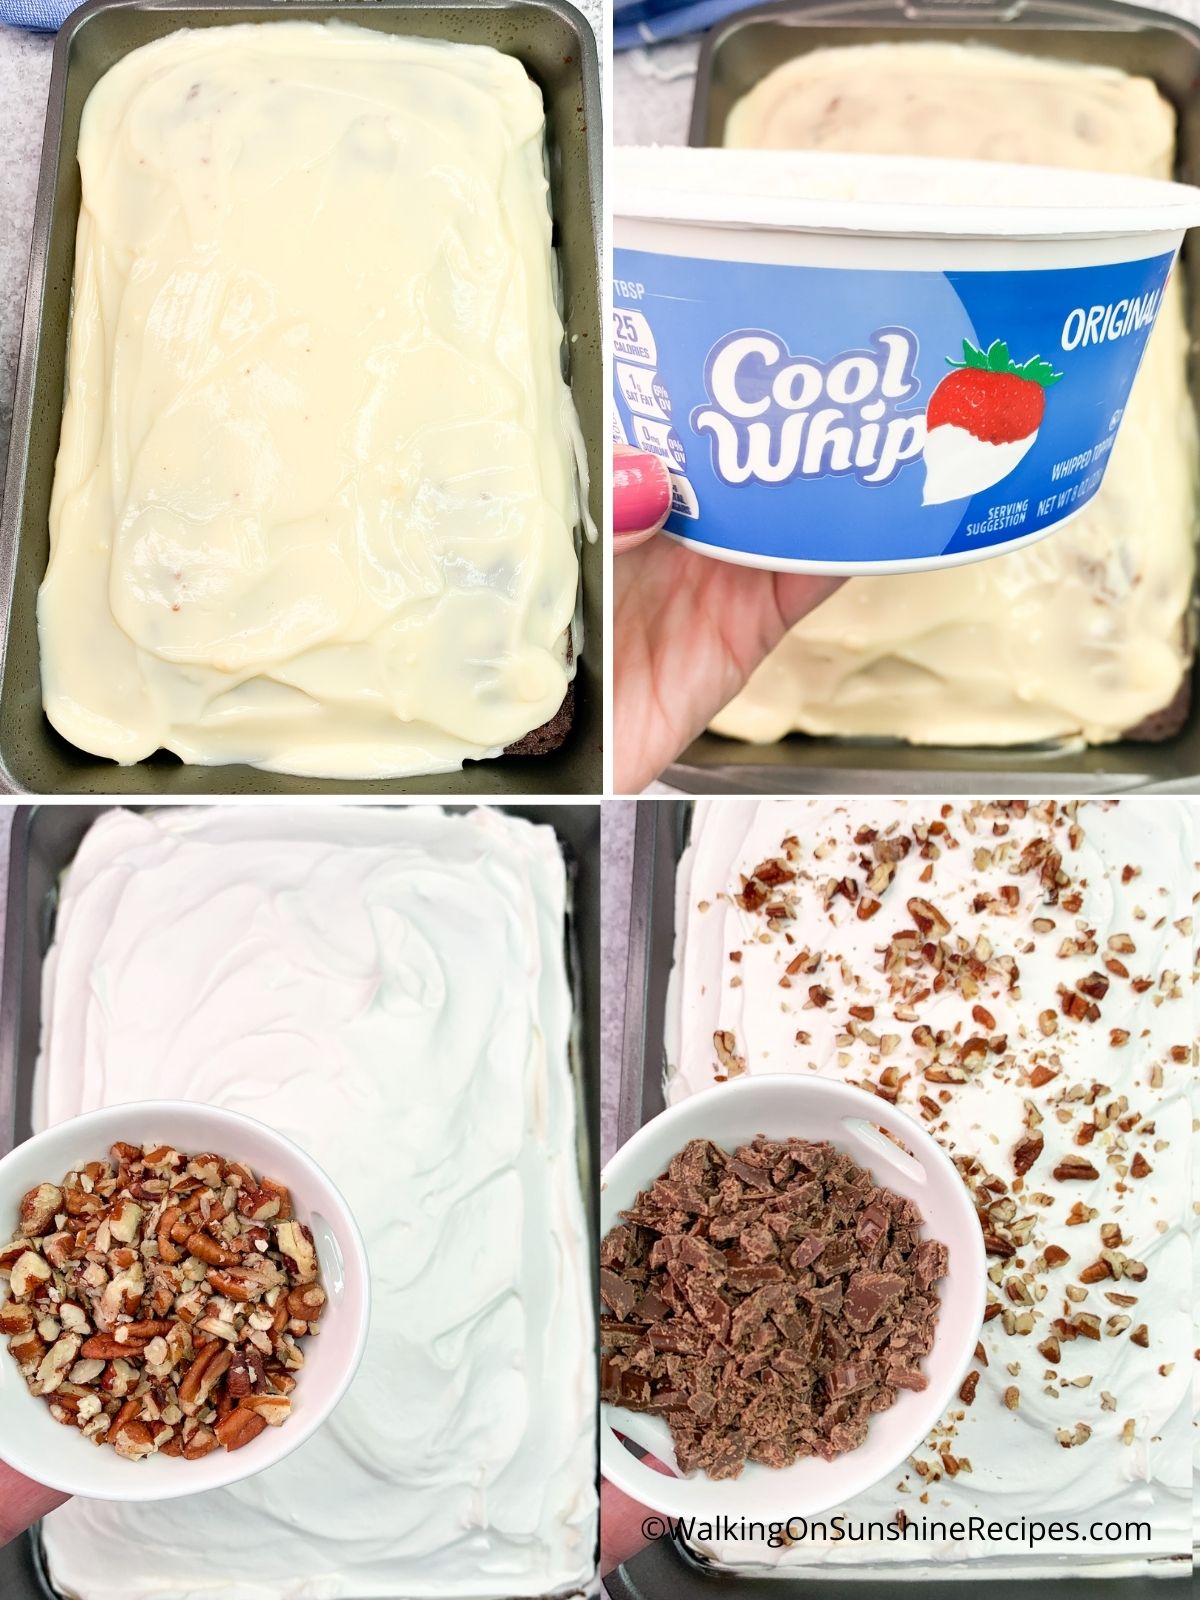
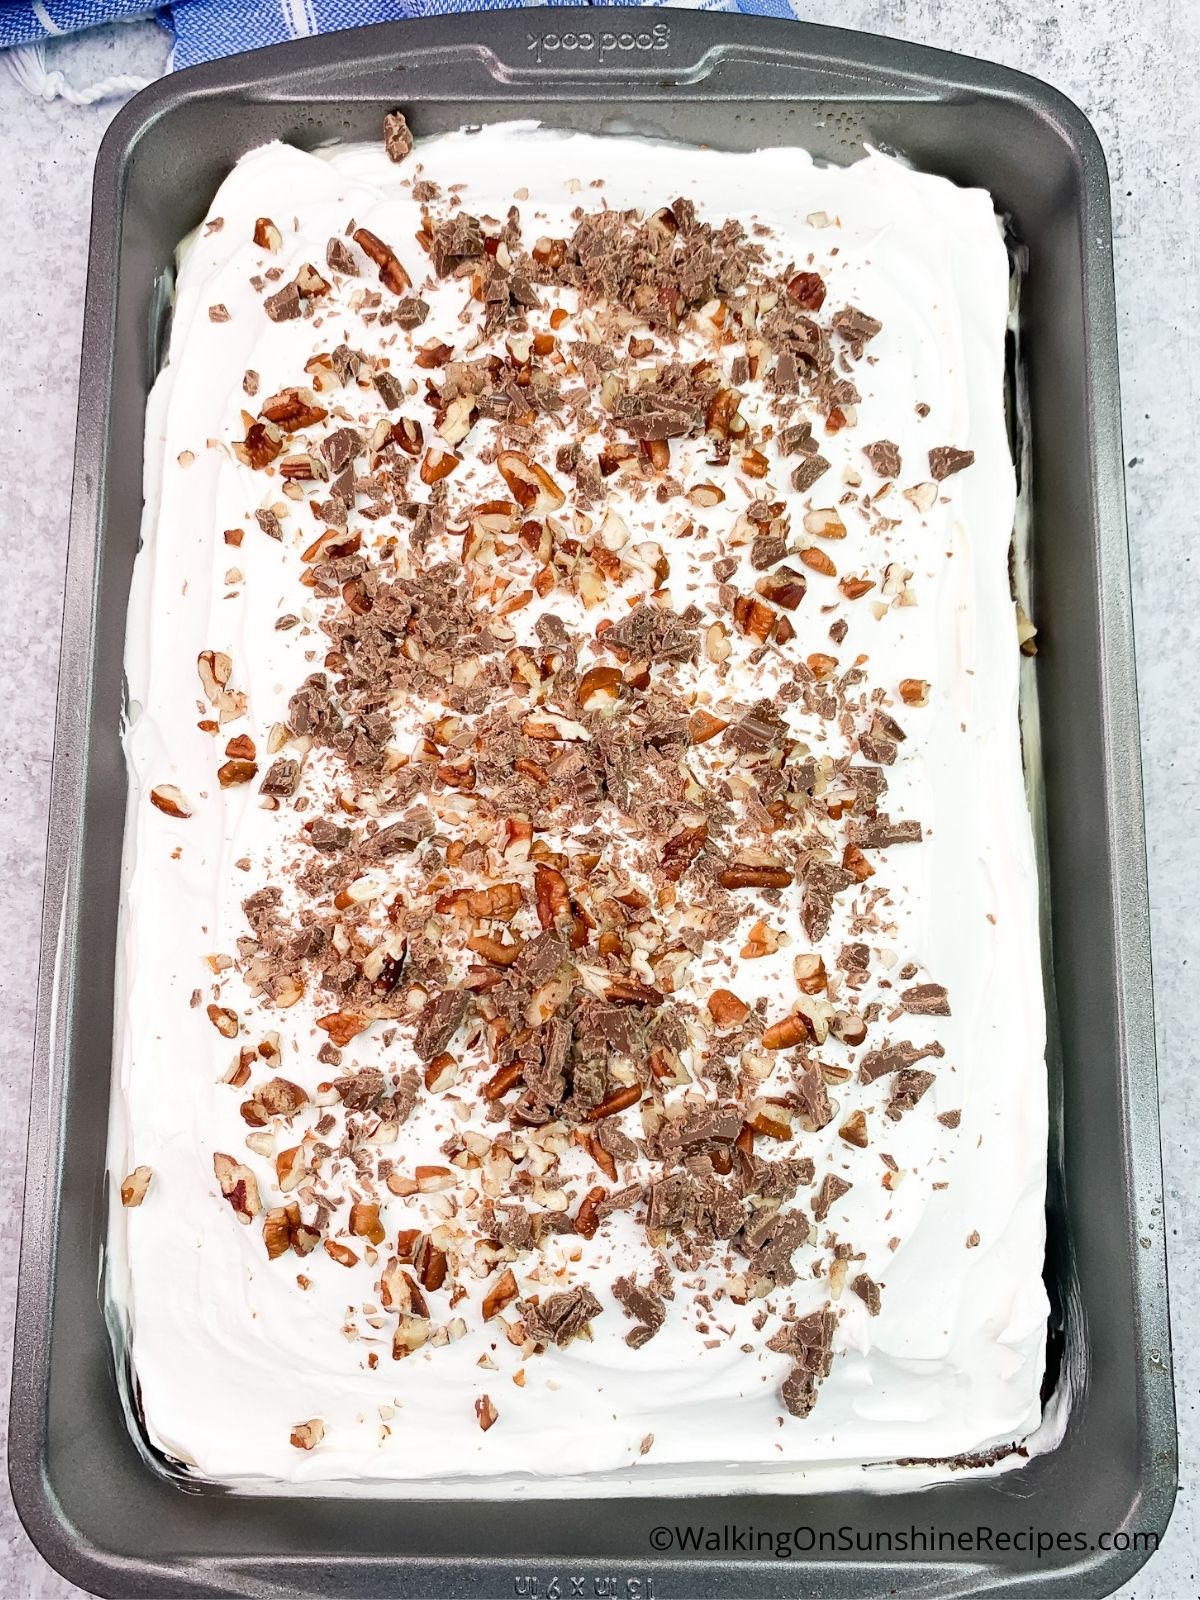
Step 3: Let the remaining pudding thicken, then spread it evenly over the cake. Refrigerate the cake for at least an hour, preferably overnight, covered with plastic wrap. Once chilled, frost the cake with half a container of Cool Whip and garnish with grated chocolate and chopped pecans.
Step 4: Chill the cake for about an hour before serving. This cake should serve 12 - 16 people.
Storage, Freezing and Thawing Instructions
Refrigerate: Store any leftovers in the refrigerator, covered with plastic wrap or in an airtight container, for up to 3 days.
Freezer: To freeze the poke cake, first wrap it in plastic wrap and then in aluminum foil. Label and store in the freezer for up to 3 months. If the cake is frosted, flash freeze before adding the plastic wrap.
Thaw: Allow the cake to thaw in the refrigerator.
Recipe FAQ's
To view the answers, simply click on the down arrow (⬇) next to each question. If you have any other questions not answered here, please leave a comment!
To thicken pudding for cake filling, use instant pudding mix and reduce the milk to about three-quarters of what the package calls for. This helps the pudding set up thicker so it stays in the cake instead of soaking in.
A wooden skewer or the handle end of a wooden spoon works best for poking a cake. Both create long, even holes without tearing the cake, so the pudding filling settles in nicely.


More Cake Mix Recipes to Love
Looking for more delicious recipes? Try my Strawberry Cheesecake Pudding Cups, Jello Cheesecake Pudding Recipes or my delicious Vanilla Pudding Cheesecake.


LOVE this recipe? SAVE it for Later!
❤️Tap the heart icon in the lower right corner to add the recipe to your recipe box for easy access anytime.
If you made it, leaving a star rating or quick review is always appreciated and helps other readers too.
Want to save this printed recipe? The Ultimate Meal Planner & Recipe Binder helps you keep recipes organized in one easy place.
📖 Recipe Card
Cheesecake Pudding Cake
Ingredients
- 15.25 ounce chocolate cake mix
- 2 - 3.5 ounce cheesecake flavored Jell-O Brand Instant Pudding; 4-serving size each
- 1 cup powdered sugar
- 4 cups milk
- ½ tub Cool Whip Whipped Topping
- chocolate candy bar for garnish if desired
- chopped pecans for garnish if desired
Method
- Prepare the cake mix as directed on the back of the package.
- Pour the batter into a 13x9 inch baking pan that's been sprayed with non-stick baking spray.
- Bake according to the directions on the back of the package.
- After the cake has cooled slightly, poke holes all around the cake using the rounded handle of a wooden spoon.
- Once the cake has the holes, prepare the pudding mix by combining the 2 boxes of mix with the powdered sugar in a large bowl.
- Stir in the milk.
- Using an electric mixer, beat on low speed until all is combined.
- Before the pudding starts to thicken, pour about half of the THIN pudding over the cake and into the holes.
- Allow the remaining half of the pudding to thicken and then spread it over the top of the cake.
- Place the cake in the refrigerator for at least an hour or longer if you have the time. I covered mine with plastic wrap and left it in the refrigerator overnight.
- Remove the cake from the refrigerator and spread about half of a container of Cool Whip on top of the cake to frost the cake.
- Garnish with grated chocolate and chopped pecans.
Nutrition
Notes
Tips
- Use instant cheesecake pudding mix and reduce the milk slightly so the filling sets thick and stays in the cake.
- Poke the cake while it is still warm so the pudding fills the holes evenly.
- Let the cake chill completely before adding the topping to help the layers set cleanly.
Storage and Make Ahead Tips
- Store the cake covered in the refrigerator for up to 4 days.
- This cake can be made a day ahead and actually tastes better after chilling.
- Keep chilled until ready to serve for the best texture.

Comments
No Comments